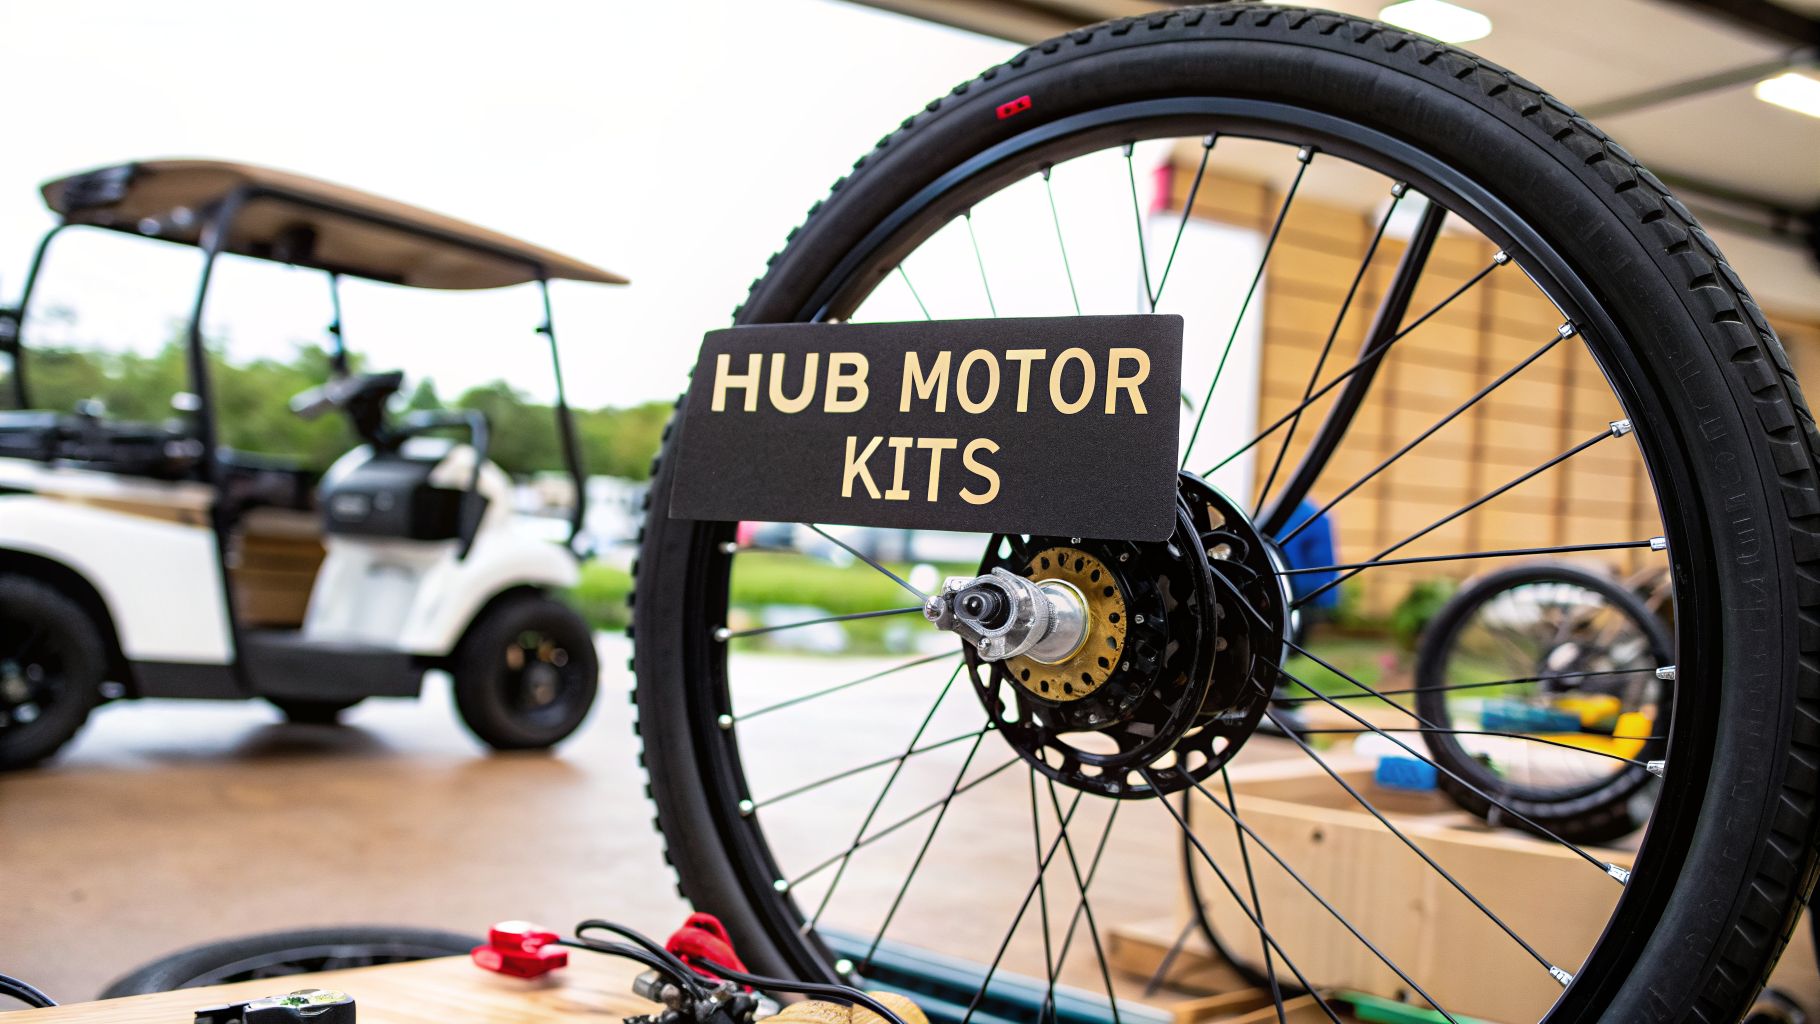
Ever thought about giving your bicycle or cart its own built-in engine? That’s the simple idea behind hub motor kits. These kits pack a motor directly into the hub of a wheel, turning just about any standard bike or cart into an electric-powered ride. It's one of the most popular DIY upgrades out there for a reason.
So, How Do These Hub Motor Kits Actually Work?

Think of a hub motor kit as a self-contained power system designed to work together perfectly. It's like a mini car engine, but simplified and cleverly fitted right into your wheel. The whole point is to take electrical energy from a battery and turn it into the rotational force that gets you moving—no pedaling or pushing required.
This no-fuss approach is exactly why these kits have blown up in the electric mobility world. The global market for eBike Hub Motor Kits is on track to jump from USD 4.9 billion in 2025 to a massive USD 15.0 billion by 2033. It's all thanks to a DIY boom that’s making electric power accessible to everyone.
The Core Parts of a Hub Motor Kit
Every kit, no matter how powerful or fancy, is built around four key components. Getting a handle on how they interact is the first step to nailing your electric conversion.
- The Motor (The Muscle): This is the heart of the whole operation. Tucked inside the wheel's hub, it uses magnets and copper windings to generate a magnetic field that spins the wheel, giving you the torque and speed you need.
- The Controller (The Brain): If the motor is the muscle, the controller is the brain. This little electronic box takes commands from your throttle and tells the motor precisely how much juice to pull from the battery. This ensures you get smooth, controlled power.
- The Throttle (The Accelerator): This is how you tell the system what to do. It’s usually a twist-grip or a thumb lever on your handlebars. When you use it, you're sending a signal to the controller, telling it how fast you want to go.
- The Battery (The Fuel Tank): This is where all the energy comes from. The battery's voltage and capacity dictate your top speed and, just as importantly, how far you can go on a single charge. It’s the fuel that keeps your electric ride running.
How It All Comes Together
When you hit the throttle, a seamless chain of events kicks off almost instantly. The throttle sends an electrical signal to the controller. The controller then draws a specific amount of power from the battery and channels it into the motor in the hub. This electricity energizes the motor's windings, creating an electromagnetic force that pushes against the internal magnets and makes the entire wheel spin.
The real beauty of this setup is how neatly everything is integrated. By putting the motor right inside the wheel, you get rid of all the external chains, belts, and gears you see on other electric drive systems. The result? A cleaner look, much quieter operation, and usually a way simpler installation.
Most hub motors are a type of direct drive motor, meaning the motor's axle is the wheel's axle. It’s a design prized for its sheer reliability and efficiency, mainly because there are so few moving parts to break or wear out. Once you understand these basics, the technology feels a lot less intimidating—and you realize a powerful electric vehicle is just one DIY project away.
Choosing Between Front and Rear Hub Motors
When you're piecing together a hub motor kit, one of the first decisions you'll make is where to put the motor: on the front wheel or the back? This isn't just a minor detail—it completely changes how your e-bike or electric cart will handle, perform, and feel on the road or course.
Think of it like the difference between a front-wheel-drive and a rear-wheel-drive car. One pulls you, the other pushes you. Each has its own distinct personality and performance quirks, especially when you need good traction. Getting this choice right is the first step toward building a machine that actually meets your expectations.
The Case for Front Hub Motors
Front hub motors are often the go-to for their sheer simplicity. Installation is usually a breeze because you don’t have to mess with the bike’s gears or derailleur. In most cases, you just swap out the front wheel, hook up the wires, and you’re pretty much good to go.
This setup creates a cool "all-wheel-drive" effect. Your legs power the rear wheel, and the motor powers the front one, giving you two independent sources of propulsion. On flat, paved surfaces, this can feel incredibly stable and gives a unique riding sensation that many commuters love.
But this design isn't without its downsides. All that motor weight on the front wheel can make the steering feel a bit heavy and sluggish. More importantly, the front wheel naturally has less weight pressing down on it, which means you can easily lose traction on steep hills, loose gravel, or slick, wet pavement. It’s not uncommon for the wheel to just spin out when you need grip the most.
The Power and Stability of Rear Hub Motors
There’s a reason rear hub motors are the most common choice: they just feel more natural and intuitive. Since most of your weight (and the cart's) is already over the back wheel, a rear motor gets a huge traction advantage right off the bat. This is a game-changer when you're climbing steep inclines or navigating the mixed terrain of a golf course.
That superior grip allows rear hub motors to handle much higher power outputs without the risk of the wheel spinning uselessly. The motor pushes you forward—just like a standard bike is designed to be propelled—so the power delivery feels smooth, predictable, and seamless. The hub motor market's steady climb, starting at USD 13.97 billion in 2025 and projected to hit USD 17.72 billion by 2030, is built on this reliability. The dominant 70.2% market share held by rear hubs says it all: their traction advantages are critical for any serious application. You can learn more about these market trends and their impact on future EV technology on The Business Research Company.
Key Takeaway: For any project that demands high power, excellent grip on varied surfaces, or just a classic riding feel, a rear hub motor is almost always the right call. Its ability to put power down effectively makes it the clear choice for everything from high-performance e-bikes to rugged electric golf caddies.
Front Hub vs Rear Hub Motor Comparison
To make the decision even clearer, let's put them side-by-side. This table breaks down the core differences, helping you weigh the pros and cons based on what's most important for your build.
| Feature | Front Hub Motor | Rear Hub Motor |
|---|---|---|
| Installation | Easier; avoids the bike's drivetrain. | More complex; you have to work with the gears. |
| Traction | Lower; can spin out on hills or loose ground. | Excellent; your weight on the wheel prevents slip. |
| Handling | Can make steering feel heavy and less nimble. | Preserves the natural handling and feel. |
| Power Limit | Lower; limited by traction and fork strength. | Higher; can handle much more powerful setups. |
| Best For | Flat-terrain commuting, simple DIY projects. | High-performance builds, hill climbing, golf. |
Ultimately, choosing between front and rear hub motor kits boils down to how you plan to use it. If you just want a simple, casual ride on flat ground, a front hub can get the job done. But for almost any other application—especially those needing real power, stability, and reliable grip—the rear hub motor is the undisputed winner.
Decoding the Components in Your Kit
A hub motor kit is a lot more than just the motor itself—it’s a complete ecosystem of parts designed to work in perfect sync. Understanding what each piece does is critical, not just for putting it all together, but for getting the performance you actually expect. Think of it like a performance car engine; every single component has a specific job that contributes to the final ride.
When you first unbox your kit, you'll find a few key players staring back at you. The most important are the controller, the throttle or sensor, and of course, the battery. Getting to know these parts will demystify how your new electric ride really works. Their simplicity and effectiveness are major reasons why hub motors are so popular in the first place.
And they are wildly popular. Industry data shows that hub motors are projected to capture 64.37% of the market share for electric bike kits by 2026. This is largely because their straightforward design makes them a favorite among DIY builders. The entire electric bike kit market is expanding like crazy—forecasted to grow from USD 75.57 billion in 2025 to USD 219.19 billion by 2034. The easy-to-install nature of hub motor kits is a huge part of that growth. You can explore more data on this trend in the full market analysis from Fortune Business Insights.
The Controller: The Brain of the Operation
If the hub motor is the muscle, the controller is the brain. This small, usually aluminum box is the central processing unit for your entire system. It takes commands from your throttle and translates them into precise, calculated power delivery to the motor.
Without a controller, you'd have an uncontrollable surge of power—all or nothing. The controller’s job is to manage the flow of electricity from the battery to the motor, ensuring a smooth, safe, and efficient ride. It’s constantly monitoring your inputs and adjusting the output in milliseconds.
The Throttle and Pedal Assist: Your Gas Pedal
So, how do you tell the brain what you want it to do? That's the job of the throttle or a pedal-assist sensor (PAS). These parts are your direct interface with the power system, acting as the accelerator for your new e-bike or vehicle.
- Throttle: This is the most direct way to control your speed. It comes in two main flavors: a twist grip, just like a motorcycle, or a thumb lever that you press to accelerate. Throttles give you on-demand power, meaning you don’t even have to be pedaling for the motor to engage.
- Pedal-Assist Sensor (PAS): A PAS system works a bit differently. It uses a sensor near your bike’s crankset to detect when you're pedaling, then signals the controller to provide a boost. It feels less like a separate accelerator and more like you suddenly have bionic legs that amplify your own effort.
Most kits will give you one or both options, letting you dial in the riding style that feels best to you.
Pro Tip: For a project like motorizing a golf caddie, a throttle is non-negotiable (it's often a remote control). A pedal-assist system wouldn't make any sense, since there are no pedals to begin with. The Caddie Wheel, for example, uses a simple remote throttle for intuitive, hands-free control.
The Battery: The Fuel Tank
The battery is, without a doubt, the single most critical component determining your kit's performance. It’s the fuel tank, and its specs directly impact your real-world speed and range. You’ll see two key numbers on any battery pack:
- Voltage (V): Think of voltage as the "pressure" of the electrical current. Higher voltage generally translates to a higher top speed and more "punch" when you accelerate. Common voltages for hub motor kits are 36V, 48V, and 52V.
- Amp-Hours (Ah): This number measures the battery's capacity—how much fuel it can hold. A higher Ah rating means you can ride for a longer distance before needing to recharge. For a deeper dive, check out our guide on how to calculate power consumption the right way.
Finally, any quality battery pack will include a Battery Management System (BMS). This vital internal circuit board acts like a bodyguard for your battery cells, protecting them from dangerous conditions like overcharging, over-discharging, and overheating. A good BMS is non-negotiable for both safety and getting the longest possible life out of your battery.
Getting Your Hands Dirty: Installation and Compatibility
Alright, this is where the rubber meets the road—or, more accurately, where the hub motor kit meets your garage workbench. The idea of installing one of these kits can feel a little daunting, but let's be clear: you don't need to be a master mechanic to pull this off. Success comes down to careful prep work and one crucial first step: making absolutely sure everything is compatible before you even pick up a wrench.
Think of it as the "measure twice, cut once" rule of DIY e-bikes. Skipping this pre-flight check is the number one reason conversions go sideways, leading to a world of frustration, wasted hours, and extra trips to the hardware store. If you nail a few key measurements upfront, you’re setting yourself up for a smooth build that gets you out on the road or the course without any drama.
At its core, your kit is a simple but powerful system: the motor, controller, battery, and throttle all working in harmony. This little diagram helps visualize how they all connect to bring your project to life.

It’s pretty straightforward: the controller is the "brain," taking the "go" signal from your throttle and drawing "fuel" from the battery to power the motor. Simple, right?
Your Must-Do Compatibility Checklist
Before you get carried away with the excitement of the build, grab a measuring tape and work through these non-negotiable checks. Getting this right now will save you from that sinking feeling of discovering a mismatch halfway through.
-
Dropout Spacing: This is the big one. The "dropouts" are just the slots in your frame where the wheel's axle sits. You need to measure the distance between the inside faces of these slots. A standard front fork is usually 100mm, and a rear frame is often 135mm, but you absolutely have to measure your own bike or cart to be certain. Your hub motor's axle has to match this measurement perfectly.
-
Brake System Harmony: Your existing brakes have to play nice with the new motorized wheel. If you’re running rim brakes, you’re pretty much in the clear. But if you have disc brakes, you have to make sure the hub motor has the right mounting points (it's almost always a 6-bolt pattern) for your brake rotor.
-
Frame Material and Strength: Adding a motor means adding weight and torque, which puts extra stress on your frame. Aluminum and steel frames are generally tough enough to handle it without issue. Carbon fiber frames, however, are a different story. They're often not recommended for hub motor conversions because the dropouts might not be strong enough to handle the motor's twisting force without cracking.
A Quick Rundown of the Installation Steps
While every kit is a little different, the general process follows a pretty logical flow. You don’t need to be a pro, but you do need to be patient and work methodically. Having a clear picture of the steps makes all the difference, just like we outlined in our guide on how to convert a push cart to electric.
- Wheel Installation: First things first, get the tire and tube mounted on your new motorized wheel. Then, slide the wheel into the dropouts, making sure any anti-rotation washers are seated correctly. These are critical—they keep the axle from spinning in place under power.
- Component Mounting: Next, find good homes for the controller, battery, and throttle. The controller needs a safe, protected spot, and the battery (your heaviest component) needs sturdy mounts.
- Wiring It All Up: This part looks more intimidating than it is. Most modern kits use color-coded, plug-and-play connectors that are hard to mess up. Connect the throttle, brake levers (if they have motor cut-off switches), and any pedal-assist sensors to the controller. Finally, connect the big power lines from the motor and battery to the controller.
Crucial Tip: Always connect the battery as the very last step. This simple habit prevents any accidental sparks or power surges that could fry your electronics while you’re still hooking things up. Once everything is connected and the wires are neatly zip-tied, you're ready for that first test ride.
Adapting Hub Motor Kits for Golf Carts

The appeal of a good DIY project is strong, and it’s tempting to think you can slap a generic hub motor kit onto a golf push cart and call it a day. But the reality is that a golf course presents a unique set of challenges that a standard e-bike kit just isn't built to handle. We're talking about a world of constant stop-and-go, uneven turf, and the need for precision control while you're focused on your game, not tinkering with your gear.
Trying to retrofit a kit designed for a bicycle onto a three-wheeled cart often becomes a frustrating lesson in makeshift engineering. You're not just adding a powered wheel; you're attempting to invent a whole new system on a frame that was never meant to support it. This usually leads to a clunky, unreliable setup that creates more problems than it solves.
The Reality of DIY Golf Cart Conversions
The first, and often biggest, roadblock is the wheel itself. Most golf push carts use smaller, wider wheels than a typical bicycle, and their axle mounts are completely different. Right away, this mismatch forces you into fabricating custom brackets or even modifying the cart’s frame, which can easily compromise its strength and stability.
Then comes the wiring nightmare. A standard kit arrives with a messy web of cables for the controller, battery, throttle, and motor. It's up to you to figure out where to mount everything and how to run all those wires without them looking like a disaster. The result is often a tangle of zip-tied cables ready to snag on your bag, the terrain, or your feet.
Finally, you have the control problem. A bicycle throttle is meant to be on the handlebars, right at your fingertips. On a golf cart, that's just awkward. If you rig it to the handle, you’re stuck right next to the cart, unable to walk freely. This completely defeats the purpose of having a powered caddie that should follow you around.
The core issue is this: generic hub motor kits are designed for continuous motion, not the specific rhythm of a round of golf. Golf demands hundreds of small starts, stops, and tiny adjustments—a use case that generic throttles and control systems handle very poorly.
Purpose-Built Solutions for Golfers
This is where a system designed by golfers, for golfers, makes all the difference. Products like the Caddie Wheel aren't just generic kits repackaged; they are fully integrated solutions created to master the unique demands of the golf course. They solve the compatibility, wiring, and control headaches right out of the box.
The difference comes down to the design philosophy. Instead of turning you into a part-time mechanic and fabricator, an integrated system offers a 'drop-on' installation that’s as simple as it sounds.
- Effortless Installation: The Caddie Wheel, for example, attaches in minutes with a simple, snap-in bracket. No wiring to run, no custom mounts to build.
- Integrated Power: The battery is built right into the wheel hub. This completely eliminates the need to strap a bulky, separate battery pack somewhere on your cart’s frame.
- Intuitive Control: An awkward bicycle throttle is replaced by a simple, handheld remote. This gives you total freedom to control forward, reverse, and braking from wherever you are on the course. You can walk ahead to your ball and have the cart follow you.
Of course, the technology in hub motor kits is incredibly versatile and can be adapted for all sorts of cool projects, like an All Terrain 4x4 Recreational Electric Vehicle. But when it comes to a specialized application like golf, a purpose-built design is almost always the superior choice.
Why a Drop-On System Wins on the Course
The benefits of a purpose-built system become crystal clear during your first round. That remote control lets you send your cart ahead to the next tee box while you're still on the green, which helps speed up your pace of play. The integrated battery means a clean, uncluttered setup with zero risk of snagging loose wires. If you want to dive deeper, our breakdown of a wheel hub motor kit for golf gives you more detail.
Ultimately, while a DIY conversion with a generic hub motor kit is technically possible, it usually ends in a compromised and frustrating experience. For golfers who value reliability, simplicity, and a seamless day on the course, a purpose-built, integrated system like the Caddie Wheel is simply the smarter investment. It delivers on the promise of an electric caddie without all the headaches of a DIY project gone wrong.
Keeping Your Ride in Top Shape and On the Right Side of the Law
Alright, you’ve done the hard part—the conversion is complete, and your ride has a new electric soul. But your journey as an owner doesn't stop when you put the tools away. To make sure that hub motor kit gives you years of reliable fun, you need to think about long-term care and know the rules of the road.
A little bit of proactive maintenance makes a world of difference. Think of it like a regular check-up for any vehicle. These simple steps don’t require a full-blown workshop, but they're absolutely essential for catching small issues before they turn into major headaches. It all comes down to the three pillars of your system: the battery, the electrical connections, and the motor itself.
Simple Steps for Long-Term Reliability
Keeping your kit humming along is surprisingly easy. Just a few minutes of attention every now and then can dramatically extend the life of your components. This is especially true for the battery, which is almost always the most expensive part of any e-bike build.
Here are a few best practices that will pay you back in performance:
- Look After Your Battery: Try to avoid running your battery completely dead. A good rule of thumb is to plug it in when it gets down to around 20%. On the flip side, don't leave it sitting on the charger for days after it’s full, as this can stress the cells. If you’re storing it for a while, keep it at a partial charge—somewhere around 40-60% is perfect.
- Check Your Connections: Your bike or cart is going to vibrate, and that can work connections loose over time. Every so often, give all the plugs a quick look. Make sure everything between the battery, controller, and motor is snug and free of dirt or corrosion. A loose wire is one of the most common culprits for power cutting out.
- Basic Motor Care: Hub motors are workhorses and famously low-maintenance, but they aren’t bulletproof. Keep the motor casing clean. Caked-on mud and grime can trap heat and make it less efficient. While you're riding, listen for any weird grinding or rattling sounds—that could be a sign of a bearing issue that needs attention.
Navigating E-Bike Laws and Classifications
Once your machine is running perfectly, you need to know where you can legally ride it. In most places, e-bikes are sorted into classes based on their power and whether they have a throttle. Getting familiar with these classifications is key to being a responsible rider.
While rules can vary from state to state or even city to city, the three-class system is becoming the standard. This framework is what determines which trails and bike paths are open to you.
Here’s the typical breakdown of e-bike classes:
- Class 1: This is a pedal-assist only bike (no throttle) that stops helping you at 20 mph. These are usually allowed anywhere a regular bicycle can go.
- Class 2: This class has a throttle and can be powered without pedaling, but it also tops out at 20 mph.
- Class 3: A Class 3 e-bike is pedal-assist only (usually no throttle) but offers a higher top speed of 28 mph. Because they're faster, they are sometimes restricted from multi-use paths.
Your kit’s motor wattage and whether you installed a throttle will decide which class your bike falls into. Always take a few minutes to check your local and state regulations to make sure you're riding safely and legally.
Your Top Hub Motor Kit Questions, Answered
Jumping into a hub motor conversion project is exciting, but it’s natural to have a few questions. Let's tackle some of the most common ones that come up so you can move forward with confidence.
How Much Range Can I Expect?
This is the big one, and the honest answer is: it depends. The single biggest factor is your battery's capacity, which is measured in amp-hours (Ah). But other things like hilly terrain, the total weight on the vehicle, and how hard you're running the motor all play a part.
As a general rule of thumb for an e-bike conversion, a standard 10-15Ah battery will typically get you somewhere between 20 and 40 miles (32-64 km). For a more specialized job like a golf push cart, a purpose-built system like the Caddie Wheel is designed to easily last a full 27 to 36 holes on one charge, so you're covered even on those extra-long days.
Are Hub Motor Kits Waterproof?
Most quality hub motor kits are highly water-resistant, but they aren't fully waterproof. This means they’re built to shrug off a sudden rainstorm, splashes from puddles, and general damp conditions without a problem.
Think of it this way: they're fine to get wet, but you should never fully submerge the motor, controller, or battery. If you want a specific grade, look for an IP (Ingress Protection) rating, which tells you exactly how sealed it is against water and dust.
Will a Hub Motor Kit Fit My Bike or Cart?
Compatibility is everything. The most critical measurement you need is the "dropout spacing"—that's the inside width of your frame where the wheel's axle mounts. This space needs to perfectly match the width of the hub motor's axle. No wiggle room here.
You also need to consider your frame's material. Most steel and aluminum frames are plenty strong for the job, but not all materials are up to the task. Carbon fiber frames, for example, often have dropouts that aren't designed to handle the twisting force (torque) of a motor and can be damaged. Always measure first and check your frame's suitability.
Ready to upgrade your golf game without the DIY hassle? The Caddie Wheel offers a powerful, drop-on solution designed specifically for golfers. Enjoy effortless rounds with a system that installs in minutes. Learn more and get yours today at https://caddiewheel.com.
Partager:
The Ultimate Guide to Electric Golf Pull Carts
Your 2026 Guide to Buying a Remote Controlled Golf Cart