The round starts normally. Your cart tracks straight, the bag feels lighter than it should, and you forget the motor is even there. Then somewhere around the back nine, it starts to hesitate on a hill, surge a little under load, or sound rough when you ask for steady pull across damp grass.
That's often the moment people assume the whole drive unit is done.
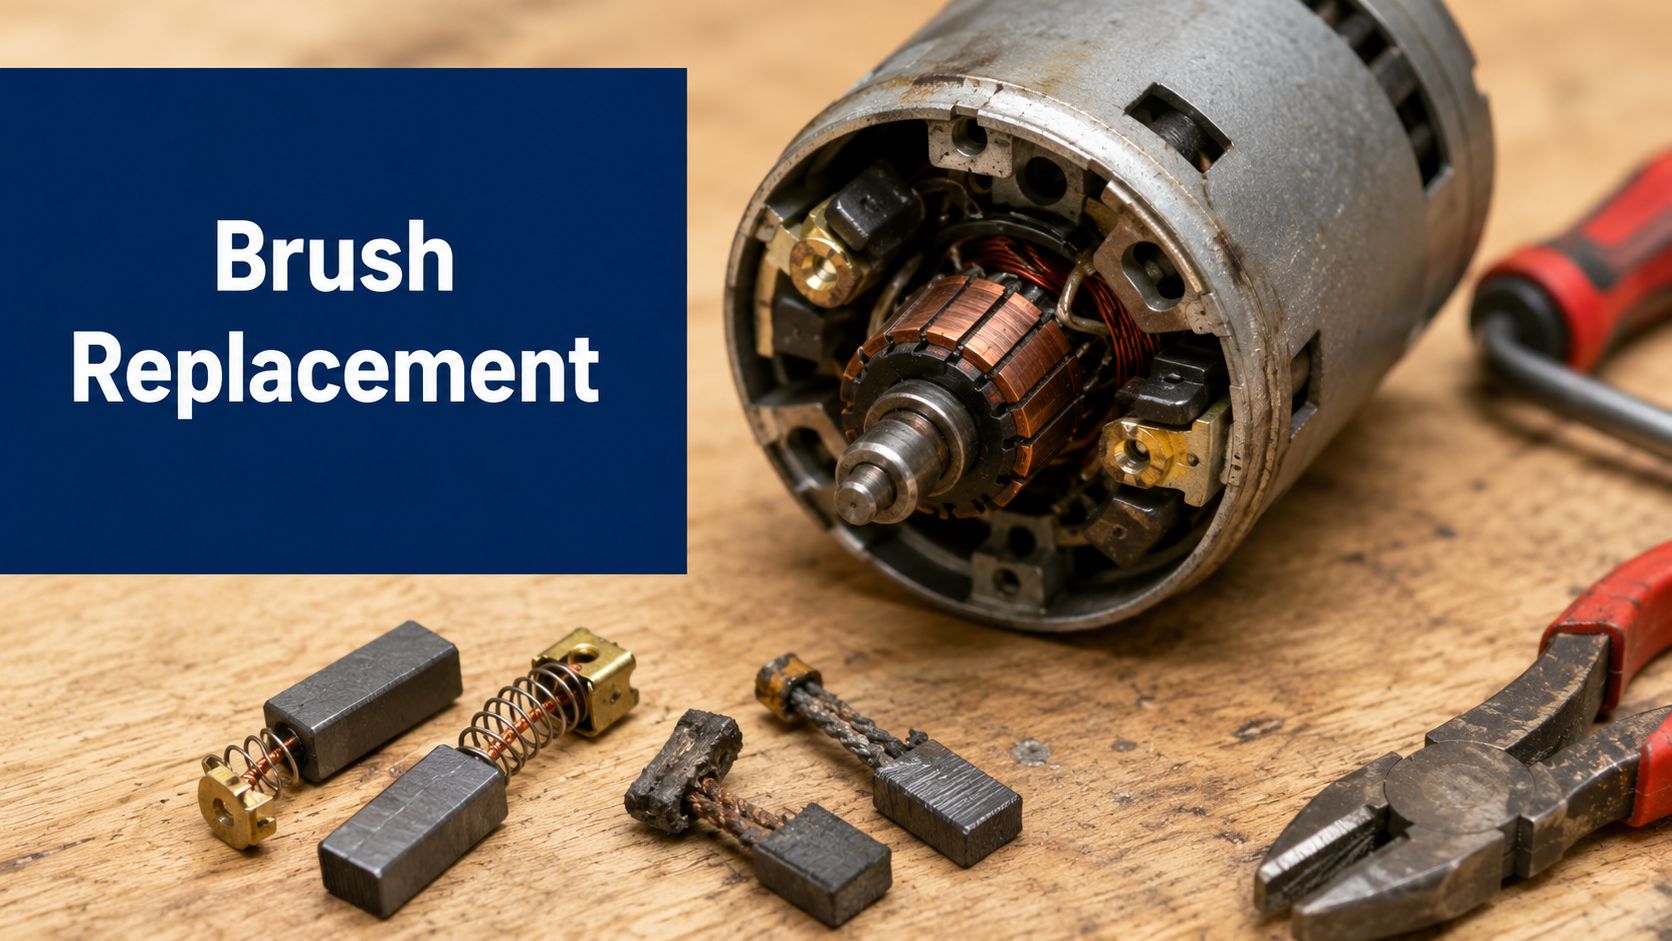
In a lot of small DC motors used on outdoor electric-assist wheels, the trouble is much simpler. The brushes wear down, contact gets poor, heat builds, and the motor loses the smooth pull it used to have. If you catch it early, replacing the brushes is one of the most practical repairs you can do at home with basic hand tools, patience, and a clean bench.
Bringing Your Electric Caddie Back to Life
A golf cart assist motor usually doesn't fail all at once. It gives warnings. You notice weaker pull on inclines. Reverse may feel less crisp. The motor may still spin unloaded in the garage, but out on the course, with weight in the bag and uneven turf under the wheels, it no longer has the same authority.
That pattern matters.
On small electric-assist wheels, brush wear often shows up as an under-load problem before it becomes a no-start problem. The motor can still turn, but it can't maintain solid electrical contact at the commutator, so torque drops off when you need it most. That's why a unit can seem “mostly fine” on the patio and then struggle badly on the fairway approach.
If you've never opened a motor before, this job is still manageable. You're not rewinding armatures or rebuilding a controller. You're inspecting, cleaning, and replacing a normal wear item. Anyone comfortable with a screwdriver, needle-nose pliers, and careful note-taking can usually handle it.
A good mindset is to treat this like servicing a reliable piece of golf gear, not rescuing a dead machine. The same habits that help with other compact motors apply here too. If you want a simple comparison point on how motor symptoms can overlap across equipment, Danny's Garage Door opener motor guide is a useful read because it shows how loss of power, odd noise, and intermittent operation often point to serviceable motor issues rather than total replacement.
A tired motor isn't always a bad motor. On small cart drives, worn brushes can make a healthy motor feel weak.
The payoff is practical. A careful brush replacement can bring back smoother starts, steadier hill climbing, and more predictable control without replacing the whole motor assembly.
Spotting the Signs of Worn Motor Brushes
Brush diagnosis should happen before you start removing covers. That saves time and prevents the common mistake of replacing parts that weren't the problem.

What you'll notice on the course
The first clue is usually loss of pull. A caddie assist wheel that used to climb a mild slope cleanly now bogs down, especially with a full bag. You may also hear the motor sound uneven, almost as if it's hunting instead of running steadily.
The second clue is sparking. A small amount of faint sparking can be normal in brushed motors, but aggressive sparking through a vent slot is not. If the spark looks bright and busy instead of small and controlled, stop using the motor until you inspect it.
The third clue is smell. Worn brushes often create a sharp electrical odor, sometimes mixed with the smell of hot carbon dust. If that smell shows up after only a short pull, it deserves attention.
The wear threshold that matters
Motor brushes in standard DC motors typically require replacement when they wear down to less than 50% of their original length, and 80% of brush-related failures are preceded by observable signs such as sparking, a burning smell, or a loss of power, which happen when the brush contact surface becomes uneven or cracked (Fact 1).
That tracks with what many golfers see in real use. The cart doesn't usually quit with no warning. It tells you, then it gets worse.
Here's a quick field check:
- Watch for load-sensitive weakness: If the motor sounds acceptable with the drive wheel lifted but weakens badly on grass or hills, brush contact is worth suspecting.
- Listen for unstable running: A smooth brushed motor has a consistent sound. Surging, crackling, or an irregular note points toward brush or commutator trouble.
- Smell after short operation: A strong burnt or ozone-like smell after a brief test run usually means friction, arcing, or both.
- Look through vents carefully: Excessive visible sparking is a warning, not a curiosity.
Practical rule: If the motor has less power, more smell, and more spark than it used to, don't keep “testing” it under load. Open it up.
What worn brushes are not
Not every weak cart has worn brushes. A dragging wheel, bad connection, failing battery, or controller issue can mimic motor trouble. But brush wear has a specific pattern. It often worsens gradually, especially after repeated use in dusty, hot, or stop-and-go conditions.
That's one reason outdoor golf use is hard on small motors. Fine debris, damp air, heat soak in direct sun, and repeated starts all work against brush life.
Sourcing and Selecting the Right Brushes
Finding the right replacement matters as much as installing it correctly. A brush that's close in size but wrong in lead type, spring arrangement, or carbon grade can create more trouble than the worn part you removed.

Start with the motor label
On a small electric-assist drive, the useful information is usually on the motor can, gearbox housing, or a tag near the drive assembly. Write down every marking before you search. Don't rely on memory. A single missing letter in a motor code can point you to the wrong part family.
If the label is hard to read, clean it gently with a dry cloth first. Then photograph it. Zooming in later at the bench is often easier than trying to decode faint print under the cart.
If you want a good primer on reading motor markings and understanding what the label is telling you, these insights for plant maintenance help translate the basics into practical part-matching.
OEM versus aftermarket
You usually have two paths.
OEM brushes are the easier option when available. They tend to fit without modification and reduce guesswork on spring length, terminal shape, and carbon composition.
Aftermarket brushes can work very well, especially for older or less-supported motors, but only if the dimensions and hardware match exactly. “Close enough” usually isn't.
A useful comparison for golfers deciding between motor types and maintenance expectations is this look at a brushless motor hub. Brushless systems avoid brush wear entirely, but many compact assist units still use brushed designs because they're simple, serviceable, and familiar to repair.
What must match
Use this checklist before you order:
| Part detail | What to verify | Why it matters |
|---|---|---|
| Brush dimensions | Length, width, and thickness | A brush that binds or rattles won't seat correctly |
| Lead and terminal | Ring, spade, soldered lead, or spring cap style | Wrong termination turns a simple install into fabrication |
| Spring setup | Captive spring, separate spring, or brush cap tension | Brush pressure must match the holder design |
| Face shape | Flat, curved, or beveled | The contact face has to suit the commutator and holder |
| Pairing | Buy a matched set of two | Mixed brushes wear unevenly |
The practice of replacing motor brushes as a set of two became a universal standard in the 1960s to maintain precise electrical balance. Brush life also changes with heat. In high-heat environments, brushes wear 40% faster, often requiring replacement every 500 to 1,000 operating hours for average-duty tools (Fact 2).
That last point matters on golf equipment more than many owners expect. Motors mounted low on a cart deal with radiant heat, low-speed climbing loads, dirt, and restricted airflow. If a cart has done a lot of summer rounds on hilly terrain, I'm much more suspicious of brush wear than I would be on a lightly used indoor appliance.
The Step-by-Step Replacement Process
The actual replacement is straightforward if you work slowly and don't skip the orientation step.

Get the motor safe and accessible
Disconnect every power source first. Remove the battery connection completely and make sure the drive can't start unexpectedly. If the wheel can roll, secure the cart so it won't move while you work.
For most small assist motors, access means removing an outer cover, side plate, or brush cap. Keep screws in order on a magnetic tray or a strip of masking tape labeled by location. Outdoor gear often uses fasteners of slightly different lengths, and mixing them up during reassembly is a common headache.
Disconnect power before opening anything. A brushed motor can jump or arc if you disturb a live lead.
If your motor sits in a tight housing, take photos at each stage. That helps with wire routing, grommet placement, and cover alignment later. It also keeps you from forcing a part back into place the wrong way.
For readers dealing with broader cart drive service beyond brushes, this guide on golf cart motor repair gives useful context on what belongs in DIY territory and what usually doesn't.
Remove the old brushes the right way
Before you pull a single brush free, inspect how it sits in the holder. This is the step that first-timers rush, and it's the one that causes many repeat failures.
When replacing motor brushes, both brushes must be replaced simultaneously to maintain proper contact balance. The beveled edge must be oriented in the exact same direction as the original. Installing it reversed causes the brush to dig into the commutator, leading to rapid wear and potential shorting (Fact 7 and Fact 8).
Here's the practical sequence I recommend:
- Mark orientation first: Use a paint marker or Sharpie on the housing to show the brush angle and top side.
- Release spring pressure carefully: Don't let the spring snap out and disappear across the garage.
- Remove one brush at a time: Keep left and right parts separate, even if they look similar.
- Inspect the face: A chipped, cracked, or heavily uneven face supports the brush-wear diagnosis.
- Compare both old brushes: If one is much worse than the other, check the holder and commutator condition closely.
Clean without getting aggressive
Once the brushes are out, look at the commutator. You're checking for heavy carbon buildup, grooves, pitting, or obvious burning. Wipe dust away with a soft, dry cloth. A small artist's brush or compressed air can help clear loose debris from the holder area.
Don't go after the commutator with coarse sandpaper or random abrasives. Light cleaning is fine. Material removal is not. If the copper segments are severely damaged, brushes alone won't make the motor healthy.
A visual walkthrough can help if you want to compare your process against another small-motor repair. This video is useful for seeing brush access and handling in real time.
Install the new brushes without forcing anything
Slide the new brush into the holder in the same orientation as the old one. It should move freely but not loosely. If it binds, stop and verify the dimensions and bevel direction. Never shave a new brush casually to “make it fit” unless you're doing a true custom repair and understand exactly what you're changing.
Then seat the spring so it applies even pressure to the back of the brush. Watch that the braided lead doesn't twist into a position where it can rub the rotating parts.
If a new brush doesn't slide cleanly in the holder, the answer is usually wrong fit or debris, not more force.
Finish one side, then do the second with the same care. Replace both from the same matched set, even if only one old brush looked badly worn. Mixed brush lengths and mixed wear patterns create uneven contact and arcing, especially under the stop-start loads common on golf terrain.
Reassemble in reverse order
Before closing the housing, do one last check:
- Brush leads clear the armature
- Springs are seated correctly
- No screws or clips are left inside the housing
- Gaskets and covers sit flat
- Wires route exactly where they were before
Then reassemble the casing snugly, not brutally tight. Small housings crack more easily than people expect.
Testing Reassembly and Initial Break-In
A fresh brush install isn't finished the moment the covers go back on. The first test matters because it tells you whether the motor is merely reassembled or actually healthy.
Check the motor before full-power use
A smart habit is to verify the windings before blaming every symptom on brushes. A thorough pre-replacement electrical and visual inspection is vital. Using a multimeter, stator winding resistance should be 0.5–3.0 ohms, and rotor segments should be 1.0–4.0 ohms between opposite sectors. Industry benchmarks show that 42% of motor repair attempts fail because technicians overlook these underlying winding defects (Fact 4).
If your readings are outside that range, or you see sooty burn marks and obvious insulation damage, replacing brushes may not solve the problem.
For a broader walkthrough on checks like continuity, resistance, and basic motor evaluation, this guide on how to test a golf cart motor is worth keeping handy.
Do a controlled first run
After reassembly, do a short low-voltage test before putting the motor back under real course load. A brief no-load run at low voltage helps confirm that nothing is rubbing, binding, or arcing excessively.
Use a short test only. You're listening for smooth rotation and watching for obvious trouble. If the motor chatters, sounds rough, or sparks hard right away, shut it down and reopen the housing. That usually points to a seating issue, wrong brush orientation, a trapped lead, or commutator damage you need to revisit.
Give the brushes a gentle break-in
New brushes need a little time to conform to the commutator face. Don't install them and immediately send the cart up the steepest fairway on the course. Start with light running and modest load so the contact surfaces can settle in.
A simple break-in routine works well:
- Run unloaded first: Confirm smooth spin and normal sound.
- Use light duty next: Short, easy movement on flat ground is better than a hard hill climb.
- Watch for improvement: Mild initial sparking can settle as the faces seat, but worsening spark means stop and inspect.
A careful break-in is boring, which is exactly why it works.
Troubleshooting Common Issues and Maintenance Tips
Sometimes the motor still isn't right after the brush swap. That doesn't always mean the repair failed. It usually means something in the install or the surrounding motor condition needs another look.

If it sparks more than before
Start with orientation. Approximately 68% of premature motor failures in universal motors stem from incorrect brush installation angles rather than material fatigue. Failure to match the beveled edge orientation causes the brush to dig into the commutator, leading to rapid degradation within 50–100 operational hours (Fact 3).
That's why I tell people to treat the bevel as non-negotiable. If the old brush came out angled a certain way, the new one goes back the same way. Not similar. The same.
Other causes of heavy sparking include dirty commutator surfaces, weak spring pressure, a poor-quality replacement brush, or a lead that isn't making solid contact.
If it runs, but still feels weak
Go back through the simple things first:
- Check every connection: A loose terminal can mimic a motor problem fast.
- Inspect the holder movement: The brush must slide freely in the holder.
- Look for mechanical drag: Wheel bearings, gearbox drag, or brake drag can make a repaired motor seem weak.
- Verify the power source: A tired battery or poor connector can show up as sluggish pull under load.
If you get stuck and want an example of how repair shops approach mobile electric drive issues in a consumer-friendly way, this article on electric bike repair near me is a useful reminder that small electric drivetrains often fail in familiar, checkable ways.
Most post-repair problems come from fit, orientation, contamination, or a missed underlying fault. Go back to basics before you assume the motor is finished.
Habits that help brushes last longer
Maintenance on golf equipment is mostly about keeping dirt, heat, and overload under control.
A few habits make a real difference:
- Blow out dust periodically: Dry debris and carbon dust collect around vents and holders.
- Keep water exposure in check: Damp grass is one thing. Storage in a wet trunk is another.
- Avoid repeated stall conditions: If the wheel is jammed or heavily loaded, don't keep feeding power.
- Listen for change: Motors usually tell you when they're getting unhappy. A new sound is maintenance information.
If you learn how to replace motor brushes once, the next service is much easier. The main skill isn't hand strength. It's observation.
If your current setup is wearing you out, or you'd rather spend your time walking the course than wrenching on older drive hardware, Caddie Wheel offers a simple electric power-assist option for standard push carts that helps you keep the walking round without the pushing strain.
Partager:
Caddie Wheel Quad Remote Control: Master Your Game
Golf Cart Jumper: A Guide to Jump-Starters & Assist Wheels