Picture this: you’re gliding up the steepest fairway, feeling fresh and ready for your next shot. That’s not a dream—it's what happens when you upgrade your push cart with an electric assist system. Removing a freewheel is the simple, one-time task that makes it all possible, turning a tiring round into a more enjoyable walk.
Why Removing a Freewheel Is Your First Step to a Better Game

For those of us who love to walk the course, a standard push cart is a reliable partner. But let's be honest—on hilly courses or over 18 holes, the effort of pushing your gear starts to add up. That physical toll can steal energy you’d rather put into your swing.
The freewheel is the small component standing between your current cart and effortless electric power. It’s what lets the wheel spin freely forward but lock in reverse. This guide isn't just about a simple repair; it’s about an empowering upgrade. It’s the essential first step to installing a modern electric assist system, like the Caddie Wheel, which can turn your trusty push cart into a powerful electric caddie.
Conserve Your Energy for the Game
The biggest payoff from this modification is massive energy savings. Walking the course is fantastic for your health, but wrestling a loaded cart up steep inclines can leave you drained by the time you reach the back nine.
- Less Physical Strain: An electric wheel does the heavy lifting for you, especially on uphill climbs and those long treks between holes.
- Better Focus: When you’re not physically exhausted, you can keep your mental game sharp and concentrate on your shots.
- More Golf, More Often: Many golfers find they have the stamina to play more frequently or even tackle an extra nine holes when they aren’t worn out from pushing their cart.
When you decide to remove your cart's freewheel, you're not just tinkering—you're investing in a better golf experience. This one task opens the door to modern convenience, making the game more accessible and enjoyable for players of every fitness level.
This simple modification isn't just about convenience; it's about reclaiming your energy and focus for what truly matters on the course—your game. It allows you to fully embrace the health benefits of walking without the physical penalty.
The Caddie Wheel Upgrade Path
Ultimately, the goal of removing a freewheel is usually to install a motorized system. The Caddie Wheel was designed for exactly this purpose. Once the freewheel is out of the way, its simple drop-on design and snap-in bracket make the entire conversion surprisingly straightforward.
This project puts modern convenience within reach for any golfer who is comfortable with basic tools. It’s a satisfying DIY job that pays off immediately on the course, proving that a major upgrade doesn't always require a major overhaul or a brand-new, expensive electric cart.
Gearing Up for a Smooth Freewheel Removal
Trying to wrestle a freewheel off without the right equipment is a fast track to frustration—and maybe a few busted knuckles. But when you have the proper gear on hand, the job transforms from a major headache into a straightforward fix. This isn't just a list; it's what you actually need to get this done right.
The most important piece of this puzzle is the freewheel removal tool. These aren’t one-size-fits-all, so don't just grab the first one you see. Each tool has a specific pattern of splines or notches designed to lock perfectly into the indentations on your freewheel. Take a close look at your cart's freewheel and find a tool that's an exact match to prevent slipping and stripping the component.
Your Essential Toolkit for Freewheel Removal
Here's what you'll need to get the job done right, with insider tips for each tool.
| Tool | Primary Use | Pro Tip |
|---|---|---|
| Freewheel Removal Tool | Engages with the freewheel splines for turning. | Match the splines exactly! A loose fit is a guaranteed way to strip the freewheel and make removal much harder. |
| Chain Whip | Holds the freewheel cogs stationary. | Wrap the chain securely around the largest cog you can for the best grip. This prevents the wheel from spinning as you apply force. |
| Large Adjustable Wrench | Provides leverage to turn the removal tool. | Go for a wrench that's at least 12 inches long. A shorter wrench just won't give you the torque needed for a stubborn freewheel. |
| Rag & Degreaser | Cleans the hub and threads before removal. | A clean workspace prevents dirt from gumming up the threads and ensures your tools get a solid, non-slip grip. |
Once you have the correct removal tool, the chain whip and a big wrench work in tandem to provide the opposing force you need to break the freewheel loose.
The secret to removing a freewheel is all about leverage. The freewheel actually tightens itself over time with normal use, so you're fighting against months or even years of built-up force. A large wrench isn’t just a nice-to-have—it's essential for getting this done safely and effectively.
A Little Prep Goes a Long Way
Before you even think about putting a wrench on your wheel, take a minute for some simple prep work. Give the hub and freewheel a good cleaning with a rag and degreaser. Getting rid of all the dirt, sand, and old grime stops it from grinding into the threads and helps your tools get a clean, secure grip.
If you're curious about other components and their maintenance, feel free to check out our complete guide to golf cart parts.
This kind of simple modification is becoming more and more common, especially as electric options take over the fairways. The golf cart market, for example, has seen explosive growth, with North America leading the charge with 42% market growth and 215,000 units sold back in 2020 alone.
For Caddie Wheel users, this exact process—removing the freewheel—is what allows for the drop-on motorized propulsion unit. It’s a perfect example of how a simple mechanical task can unlock a major upgrade. You can dig into more of this market data over at technavio.com.
Alright, let’s get our hands dirty. This is where the real work begins as we walk through the entire process of removing a freewheel. I’ve written these instructions to be as clear as possible, whether you’re a seasoned bike mechanic or a complete beginner—no confusing jargon, just practical steps.
With your wheel off the cart and your tools laid out, you’re ready for the main event. Remember, the key here is a steady, methodical approach. Trying to muscle your way through this is far less effective than using the right technique.
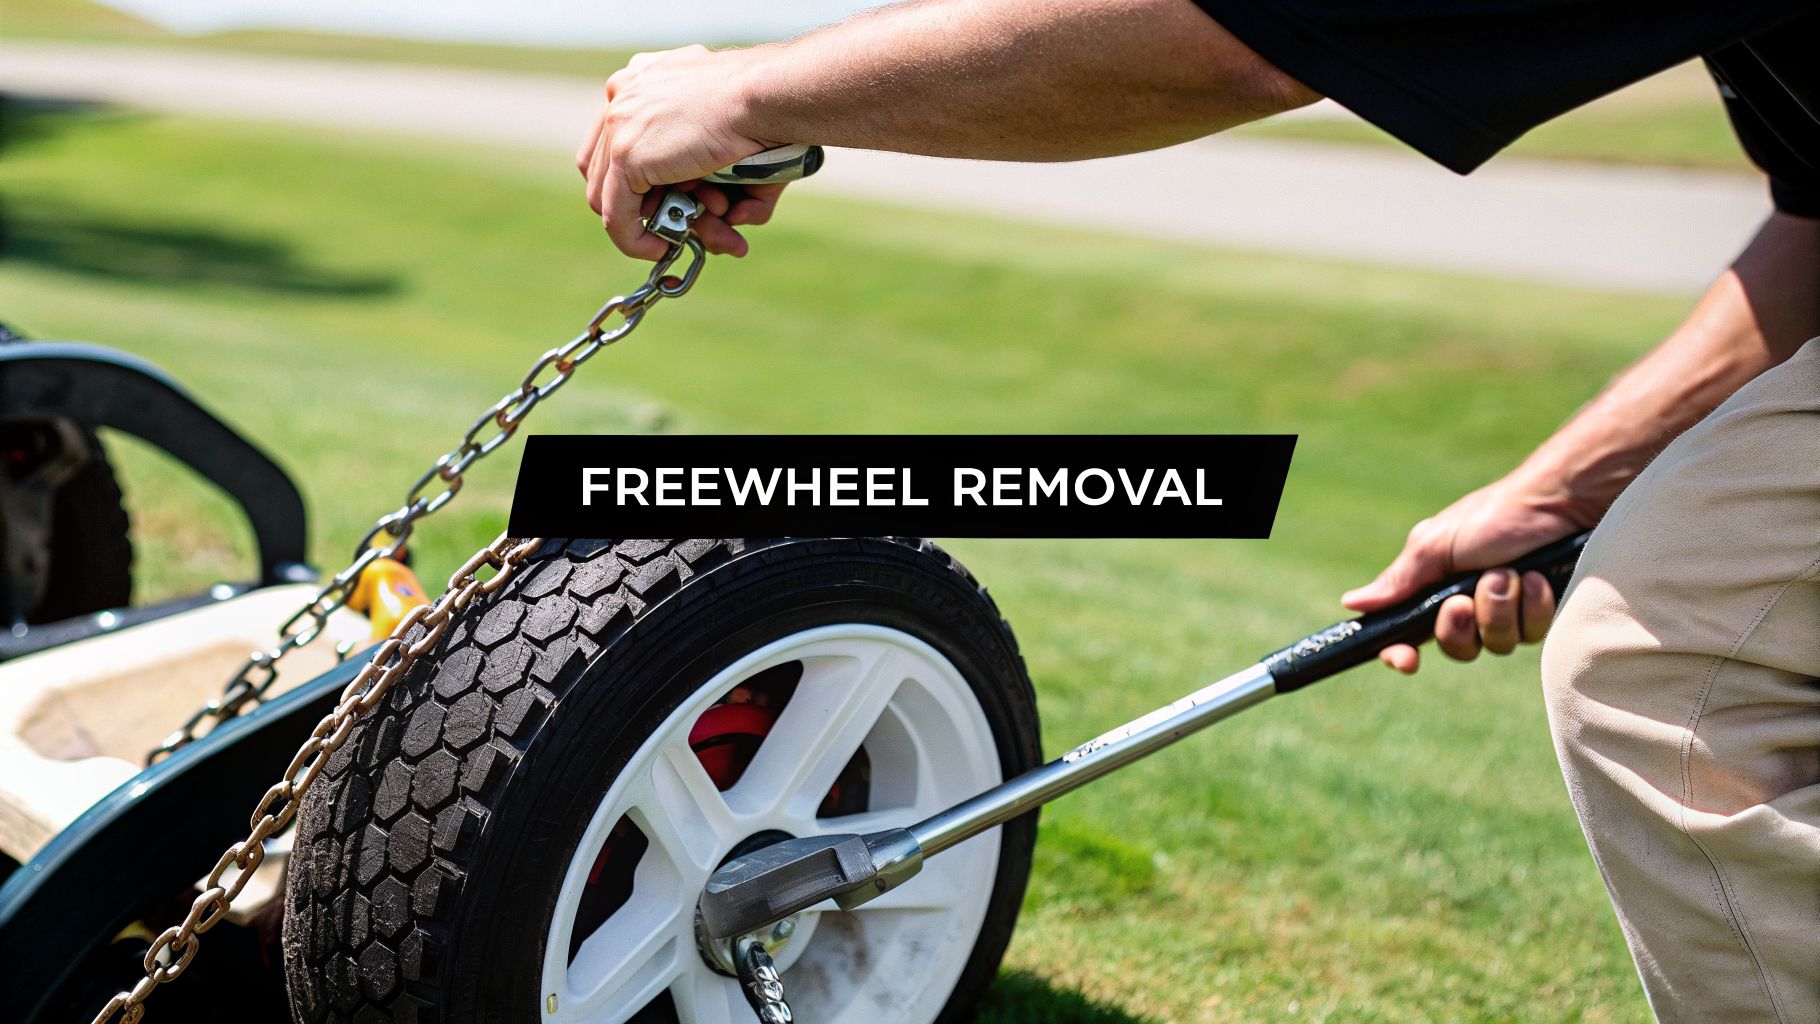
This quick diagram shows you the essential flow and how the tools work together to get the job done.

As you can see, the removal tool engages the freewheel, while the chain whip and wrench apply opposing forces to break it loose.
Secure the Wheel and Insert the Tool
First, lay your wheel down on a stable surface with the freewheel facing up. A dedicated workbench is great, but a clean spot on the garage floor works just fine. I find taking the wheel completely off the bike or cart frame gives you much better leverage and more room to work.
Grab your freewheel removal tool—the one you carefully matched to your freewheel’s splines—and insert it firmly into the notches. It should feel snug and secure. If there’s any wobble, double-check that you have the right tool. A poor fit is the number one way people strip the splines and create a much bigger headache.
Apply Opposing Force
This next part is a coordinated, two-handed job. It’s all about using opposing forces to break the freewheel’s tight grip on the hub threads.
- Engage the Chain Whip: Wrap the chain from your chain whip around the middle or larger cogs of the freewheel. You'll be pulling this tool clockwise to stop the freewheel from spinning forward as you work.
- Position the Wrench: Slide your large adjustable wrench onto the flats of the freewheel removal tool. You are going to turn this wrench counter-clockwise.
Once both tools are in position, you're ready to apply some pressure. You’ll be pulling the chain whip clockwise while simultaneously pushing the wrench counter-clockwise.
You’re not just unscrewing a nut here. A freewheel is designed to tighten itself as you pedal, so you’re working against a lot of built-up torque. Expect to use some muscle, but keep the pressure steady and smooth, not jerky.
Break It Loose
Apply firm, even pressure to both tools at the same time. You’re listening and feeling for a very distinct, and often surprisingly loud, "pop" or "crack." Don't be alarmed! This is a totally normal sound; it’s just the threads finally breaking free after being torqued down for so long. It might startle you, but it’s the sound of success.
Once it breaks loose, the hard part is over. The initial resistance disappears, and you can usually spin the freewheel the rest of the way off by hand. Just keep turning it counter-clockwise until it comes completely off the hub threads. If you're curious about the mechanics of wheel components, you can learn more by checking out our guide on the golf cart wheel hub assembly.
Congratulations! The freewheel is off. You’re one major step closer to finishing your upgrade. Set the old freewheel aside and take a second to inspect the now-exposed hub threads before moving on.
How to Handle Stuck and Rusted Freewheels
Sooner or later, every mechanic runs into it: the freewheel that just won't budge. It’s probably the most common roadblock you'll face when removing a freewheel, usually because of built-up rust, grime, or simply years of being torqued down. Your first instinct might be to just apply more force, but that’s a quick way to strip your tools or damage the wheel hub. Instead, a little patience and a smarter approach will get the job done.
This isn’t just a headache for bicycle owners. It's a major challenge for golfers looking to upgrade their push carts—a huge trend that involves turning a standard cart into a custom electric caddy. The global push cart market, valued at $250 million in 2025, is set to explode, largely because of these electric conversions. With 42% of the market share in North America and 25 million golfers in the US alone, making the game less physically taxing is a top priority. You can dig into these market trends in this detailed golf push cart market report.
Start with Penetrating Oil
Before you reach for a bigger wrench, grab a can of quality penetrating oil. This stuff is your first and best line of defense. It’s not the same as a regular lubricant; penetrating oil has an incredibly low viscosity, which means it’s designed to creep deep into threads and break down the corrosion that’s locking everything up.
Give the area where the freewheel meets the hub a generous spray. You want to get the oil right into that tiny gap between the threads. Let it sit for at least 15-30 minutes. If you’re dealing with a really stubborn freewheel, don’t be afraid to let it soak for a few hours or even overnight. Patience here can save you a ton of effort.
Once you’ve let the oil work its magic, try again with your freewheel tool and wrench. More often than not, you’ll find that a little bit of chemistry was all you needed to break it loose with firm, steady pressure.
The Bench Vise Method for Maximum Leverage
If penetrating oil didn't cut it, it’s time to bring out the heavy artillery. For a truly seized freewheel, a bench vise is your best friend. This technique gives you far more leverage than you could ever get with a hand wrench and takes the chain whip completely out of the picture.
Here’s how it works:
- Secure the Tool: First, clamp your freewheel removal tool firmly into the bench vise, making sure the splines are facing up.
- Mount the Wheel: Next, carefully lower the wheel down onto the tool. You need to ensure the splines on the tool engage perfectly with the notches on the freewheel.
- Turn the Wheel: Grab the wheel with both hands—think 3 and 9 o'clock positions for a solid, balanced grip. Now, turn the entire wheel counter-clockwise.
This method uses the wheel itself as a giant lever, giving you an incredible mechanical advantage. The steady, powerful torque is almost always enough to pop even the most rusted-on freewheels free.
Safety First: When using a vise, apply force smoothly and be prepared. The freewheel will often let go with a loud, sudden "pop." Brace yourself for that release of tension so you don't lose your balance.
A stuck freewheel can feel like a project-ending disaster, but it’s almost always a solvable problem. It just requires shifting your strategy from brute force to smart leverage. For a deeper dive into keeping your wheel components in top shape, our guide on wheel bearing kits offers some great additional insights.
Preparing Your Cart for the Caddie Wheel Upgrade

With the old freewheel off, you’re on the home stretch. This is where your wrench-turning pays off, and you can finally get your wheel ready for its new life with an electric assist. Before you get too excited and jump right into the installation, it’s worth taking a few minutes to clean and inspect the hub. This quick step is crucial for a perfect fit and reliable performance down the road.
The process of removing a freewheel has become a go-to project for golfers looking to upgrade. It’s a key part of a huge trend in the golf push cart market, which is expected to jump from USD 0.29 billion in 2026 to USD 0.65 billion by 2035. A big driver of this growth is players converting to electric models, a segment where North America makes up 42% of the market.
With electric assists like the Caddie Wheel promising up to 36 holes on a single charge, it's a smart, budget-friendly way for walking golfers to save their energy for the game. You can dig into the full research from Business Research Insights to learn more about these market shifts.
Inspect and Clean the Hub Threads
Now, take a close look at the exposed threads on your wheel's hub. You're looking for clean, well-defined threads without any metal burrs or damage that might have happened during the removal process.
Grab a clean rag and a little bit of degreaser to wipe away any old grime, dirt, or metal shavings. A clean surface is absolutely essential for the Caddie Wheel adapter to sit flush against the hub and create a solid connection.
Think of it like this: you’d never just paint over a dusty, dirty wall. You clean and prep it first for a smooth, lasting finish. The same idea applies here—a clean connection is a secure connection.
The Caddie Wheel Drop-On Design
This is where you’ll really appreciate the brilliant simplicity of the Caddie Wheel system. Unlike some of the more complex retrofits out there, the design is incredibly straightforward. The whole system hinges on a special adapter that threads right onto your wheel’s hub where the freewheel used to sit.
- Thread on the Adapter: Simply screw the new Caddie Wheel adapter onto the hub threads. Get it on there nice and firm by hand.
- Attach the Wheel: The motorized Caddie Wheel then slides directly onto this adapter. A simple snap-in bracket locks it all into place.
This "drop-on" installation is one of the system’s best features, making the jump from a manual push cart to an electric one completely seamless. As you prep your cart for this upgrade, it's also a good time to research other durable components, like heavy-duty wheels for carts, to ensure every part of your setup is built to last. A little prep work here guarantees your cart is ready for effortless power on the course.
Got Questions? We’ve Got Answers
Even with the best guide, you’re bound to have a few questions when you’re staring at a greasy freewheel, wrench in hand. Let's tackle some of the most common hangups we see, so you can get started with total confidence.
Freewheel or Cassette? Here’s How to Tell
This is the big one. Get this wrong, and you'll end up with the wrong tool and a whole lot of frustration. Thankfully, telling them apart is easy once you know what to look for.
-
Look for Freewheel Splines: A freewheel is a self-contained unit. The splines or notches for the removal tool are built right into the body of the freewheel itself. When you spin the cogs backward, that inner part with the splines stays put.
-
Look for a Cassette Lockring: A cassette, on the other hand, is just a stack of cogs that slides onto a splined freehub body. What holds it all together is a separate, thin lockring on the outside. The cassette tool grabs this lockring, not the cogs.
Take a second to clean the grime off your hub and look closely. This single step will save you a headache and a trip back to the bike shop.
Can I Wreck My Wheel Doing This?
It’s a fair question, especially with the loud, startling "crack!" you’ll hear when the threads finally break loose. But here’s the good news: damaging the wheel hub is incredibly rare if you’re using the right tool and a bit of patience. The real risk is stripping the notches on the freewheel, not the hub.
The key is to make sure your removal tool is seated all the way in. If it’s wobbly, it’s not right. A solid connection prevents the tool from slipping under pressure. Use steady, firm force—no jerky, angry movements.
Your hub's threads are tough, hardened steel. The danger isn't in the force itself, but in a poorly-fitted tool or a sloppy technique. Take your time, get a snug fit, and trust the process.
Should I Grease the Threads on the New Freewheel?
Absolutely, 100% yes. We can't stress this enough. This is the one step people skip and always regret a few years down the road. Before you install a new freewheel (or put the old one back on), apply a light coat of bicycle grease to the hub threads. It's non-negotiable.
Why? Two big reasons. First, it acts as a barrier between the steel hub and the steel freewheel, preventing them from seizing together from corrosion over time. Second, it makes the next removal infinitely easier. A little grease now will save you from a world of hurt later.
Ready to transform your push cart with effortless power? The Caddie Wheel delivers a lightweight, powerful electric assist that attaches in minutes. Enjoy your walk and focus on your game. Discover the Caddie Wheel today.
Partager:
Your Guide to the Golf Cart Gearbox
What Is the Real Golf Carts Top Speed in 2026?