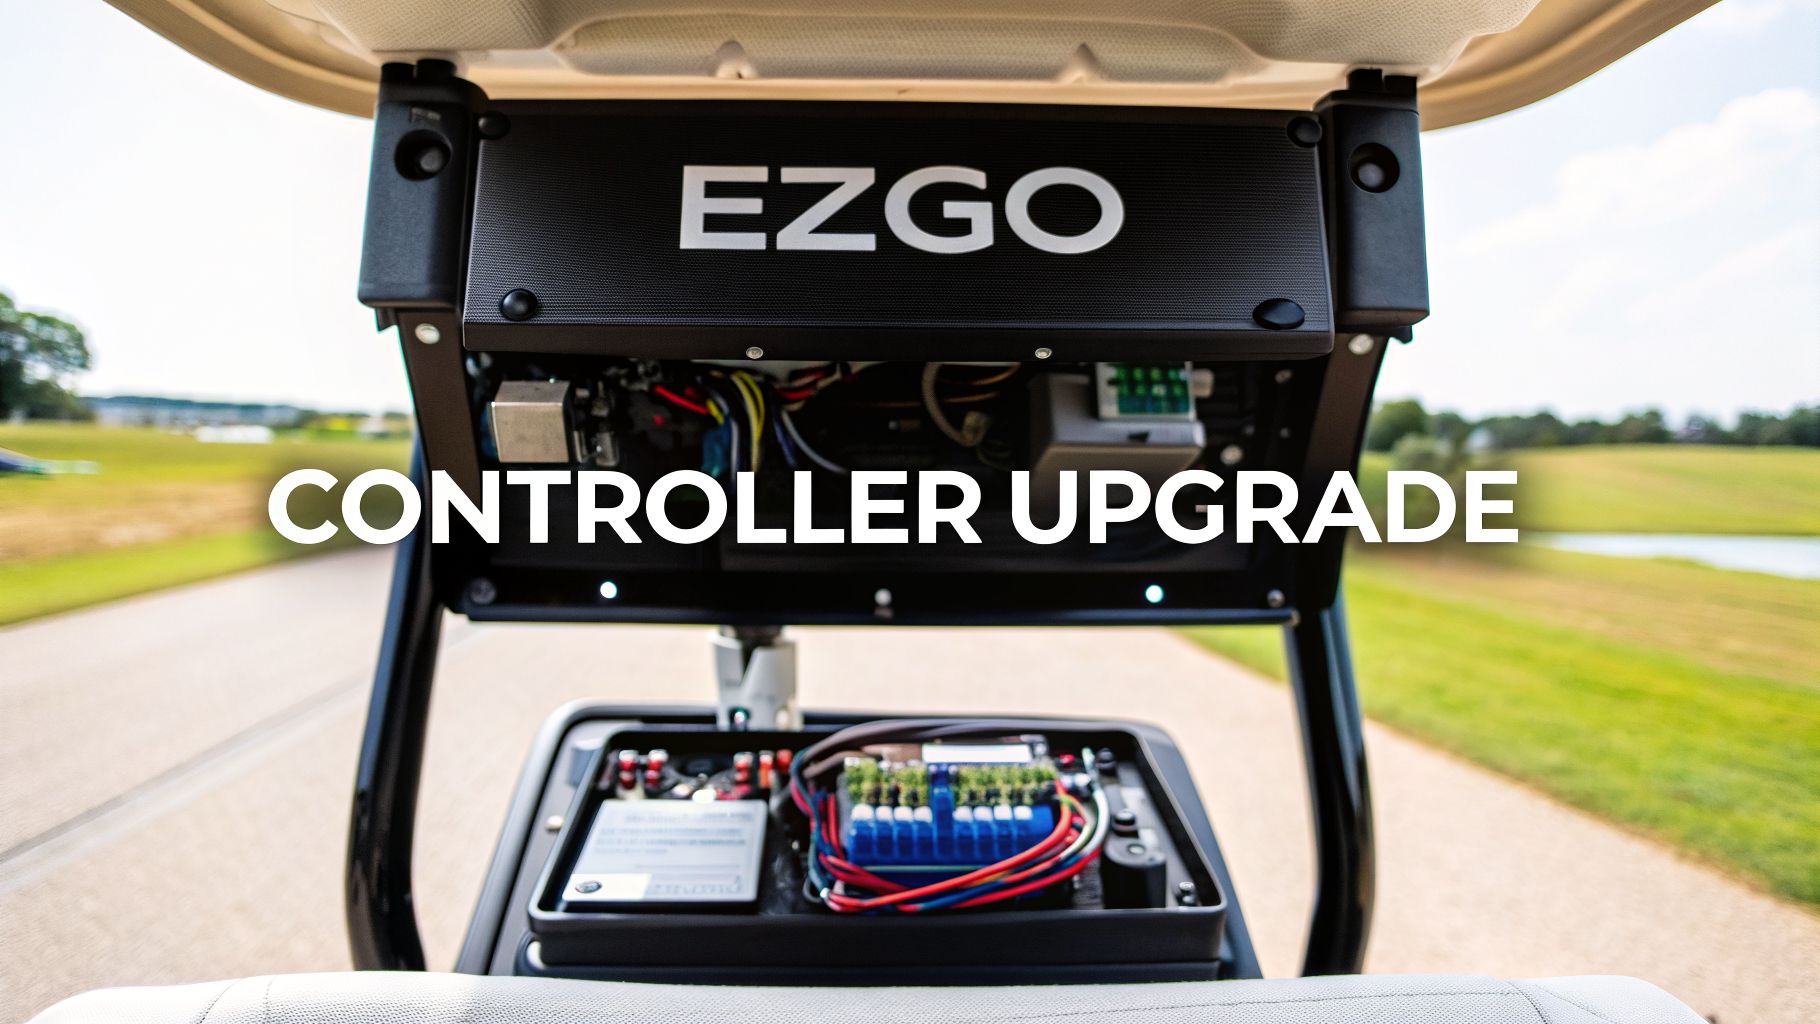
If you've ever felt your EZGO golf cart groaning up a hill or lagging behind, you’ve probably blamed the motor or the batteries. But more often than not, the real culprit holding your cart back is the controller. Think of it as your cart’s brain—upgrading it is single-handedly the biggest performance boost you can give your ride for more speed, torque, and a completely different driving feel.
Why a Controller Upgrade Is Your Cart's Biggest Power Move

The controller that comes standard on most EZGO carts is built for casual trips around a flat neighborhood, not for performance. It’s programmed to prioritize battery life over power, which means it strictly limits the amount of amperage flowing from the batteries to the motor. This creates a frustrating performance bottleneck that becomes painfully obvious the second you ask for a little more oomph.
Common Signs Your Stock Controller Is a Bottleneck
You’re almost certainly dealing with a controller bottleneck if your cart shows these classic symptoms:
- Loses steam on hills: The cart slows to a crawl or feels like it’s about to give up entirely on even slight inclines.
- Sluggish acceleration: Getting up to top speed from a dead stop feels like it takes forever.
- Struggles with extra weight: Performance drops off a cliff when you add a rear seat kit, a few friends, or a heavy load.
- Feels weak after upgrades: You installed a lift kit and bigger tires, but now your cart feels slower and weaker than it did before.
These issues pop up because the factory controller just can't supply the amperage the motor needs to handle the extra demand. At its core, the controller for ezgo golf cart is a motor variable speed controller that dictates every aspect of power delivery.
A new high-amperage controller doesn't just add a bit of speed; it completely changes your cart's personality. You get the instant torque for snappy takeoffs and the sustained power to conquer hills without even thinking about it.
The golf cart market is booming, hitting USD 1.7 billion in the U.S. alone back in 2022 and it continues to grow. With this growth comes more demand for customization. EZGO carts, a flagship brand under Textron, are built to be modified, and as owners add things like better suspension or lithium batteries, the controller becomes the final piece of the puzzle.
Swapping out the controller unlocks the power your motor and batteries already have, making the entire driving experience feel more responsive and capable. If you're looking for a more powerful ride, this is the best place to start. For even more ways to get the most out of your cart, check out our guide on how to make a golf cart faster.
Matching a Controller to Your Specific EZGO Cart
Picking the right controller for your EZGO is probably the single most important decision you'll make in your upgrade project. This isn't a one-size-fits-all game. The perfect controller for your cart depends entirely on its current setup and what you want to achieve, performance-wise. Get this match right, and you'll unlock the power you're paying for without the headaches of incompatibility.
Before you even start shopping for amps and features, you have to know exactly what kind of cart you're working with. The first step is identifying your EZGO's drive system. Over the years, EZGO has used a few different systems, and a controller built for one simply won't work on another. The main ones you'll run into are Series, PDS, and AC systems.
Identifying Your Cart's Drive System
Not sure which system you have? No problem. Here’s a quick field guide to help you figure it out right in your garage.
- Series Carts: These are the old-school workhorses. The dead giveaway is a big, clunky forward/reverse lever, usually located down by your knee. You also won't find a "Run/Tow" switch on the controller cover.
- PDS Carts: The Precision Drive System (PDS) is a bit more modern. Look for a small rocker switch on the dash for Forward/Neutral/Reverse. You’ll also spot a very obvious "Run/Tow" switch on the black plastic controller cover under the seat.
- AC Carts: These are found on the newer models like the RXV and Express. They use an AC motor and their controllers often have a heatsink with big, prominent cooling fins. Like PDS, they use a rocker switch for direction and have a Run/Tow switch.
Nailing this down is non-negotiable. It’s the foundation of your entire upgrade—it determines which aftermarket controllers are even on the table for your build.
Voltage and Amperage: The Power Duo
Once you know your drive system, the next conversation is all about power: voltage and amperage. These two specs are what will define your cart's get-up-and-go.
First, your controller's voltage must match your battery pack. It's that simple. If you're running a 36V battery setup, you need a 36V controller. If you've got a 48V system, you need a 48V controller. Trying to mix and match here is a fast track to fried components and a very bad day.
Amperage, on the other hand, is where you get to decide your cart’s personality. A higher amperage rating lets more current flow from the batteries to the motor, which gives you more torque.
More amps directly translate to better hill-climbing power and that quick, snappy acceleration that makes a cart feel truly upgraded. A stock controller is usually a measly 250A, which is why it feels so sluggish from the factory.
For most people, upgrading to a 400-500 amp controller for an EZGO golf cart is the sweet spot. This range provides a huge, noticeable boost in performance, perfect for carts with lift kits, bigger tires, or a rear seat for carrying extra passengers. If you're building an extreme off-road machine or plan on heavy towing, you might look at a 600+ amp controller. Just know that this level of power often requires you to upgrade your motor and high-current cables, too.
Choosing the right amperage is all about balancing what you need with your budget and how far you're willing to go with other upgrades.
EZGO Controller Amperage Guide
To help you visualize the difference, here’s a quick breakdown of what to expect from different amperage levels. This table will help you match a controller to your performance goals and how you use your cart.
| Amperage Rating | Best For | Performance Impact | Typical Use Case |
|---|---|---|---|
| 300-400 Amps | Neighborhood cruising, light hills | Snappier acceleration, modest torque increase | Stock carts with 2-4 passengers |
| 440-500 Amps | Lifted carts, moderate hills, heavier loads | Significant torque for climbing, much faster feel | Lifted cart with a rear seat |
| 600+ Amps | Extreme performance, steep terrain | Maximum torque and speed potential | Off-road builds, heavy-duty use |
Ultimately, a controller in the 440-500 amp range delivers the most satisfying "bang for your buck" for the average upgraded cart. It gives you that thrilling, powerful feel without necessarily forcing you into a full motor and cable replacement right away.
Your Practical Guide To Installing The New Controller
Alright, you've got the new controller. Now for the fun part: bringing your cart’s brain to life. While swapping out a controller might seem like a job for a pro, it’s totally manageable if you’re patient and methodical.
Let's walk through the process to get your new upgrade installed smoothly and safely.
Before you even think about grabbing a wrench, we need to talk about safety. This is the one step you absolutely cannot skip. On your EZGO cart, find the Run/Tow switch—it's usually right there on the controller cover—and flip it to TOW. This cuts power to the system, preventing any nasty surprises like accidental movement or electrical shorts.
Next, you'll disconnect the batteries. There's a right way and a wrong way to do this. Always disconnect the main negative terminal first, and then the main positive. It’s a simple sequence that protects you and your cart’s electronics from damage.
Pre-Installation Groundwork
Before you unbolt a single thing, grab your phone. Take several clear, well-lit photos of your current controller and all the wiring connected to it. Get shots from a few different angles. Trust me, these pictures are your get-out-of-jail-free card if you get turned around later.
Now, arm yourself with some masking tape and a permanent marker. As you disconnect each wire from the old controller, label it immediately. Match the label to the terminal you just removed it from (B+, M-, A1, etc.). Don't try to be a hero and rely on memory; a few minutes of labeling now will save you from a massive headache later.
Mounting and Connecting Your New Controller
With every wire disconnected and labeled, you can go ahead and unbolt the old controller and set it aside. Position your new controller for an EZGO golf cart where the old one was. Sometimes the mounting holes will line up perfectly, but don’t be surprised if you need to drill a couple of new pilot holes to get a solid, secure fit.
Now you can start reconnecting the wires to your new controller, using the manufacturer’s diagram as your primary guide. This is where those labels and photos you took become invaluable. As you attach each wire, give the terminal a quick inspection. If you see any corrosion, a quick scrub with a wire brush will ensure a solid connection and optimal performance.
I’ve seen it a hundred times: the most common reason a cart won't run after an install is a bad connection. Give extra love to the main B+ and B- terminals. They need to be spotless and torqued down tight to handle all that current.
This flowchart is a great visual for understanding how EZGO drive systems have evolved, which directly impacts the type of controller you're installing.

As you can see, the technology has progressed from the straightforward Series systems to the more advanced PDS and now the powerful AC systems, each demanding its own specific controller logic.
Final Checks and Powering Up
With all the wires reconnected, take a step back and do one last visual sweep. Confirm that every connection is snug and that no stray wire strands are touching the frame or another terminal, which could cause a short. While you're at it, make sure components like your fuses are in good shape and installed correctly.
The move toward powerful controllers like these is a big reason why electric carts have taken over, capturing 75.4% of the golf cart market back in 2022. Industry giants like EZ-GO, which are part of the group making up 90% of the U.S. market, rely on these sophisticated brains to manage everything from high-output AC motors to modern lithium-ion batteries.
Now for the moment of truth. Reconnect your batteries, but this time in reverse order: main positive first, then main negative. Flip the switch back to RUN.
Turn the key. You should hear a satisfying click from the solenoid—that's the "all clear" signal. Gently press the accelerator. If all went well, you'll feel that smooth, responsive power you've been waiting for.
Supporting Upgrades Your New Controller Will Need

Dropping in a new high-amperage controller is a great start, but it's only one piece of the performance puzzle. Think of your cart’s electrical system like a chain—it's only as strong as its weakest link. Your powerful new controller is a huge link, but if it’s connected to flimsy, stock components, the whole system will fail.
To really unleash the power of your new controller for an EZGO golf cart, the rest of the electrical pathway needs to be able to keep up. This is probably the most common mistake we see people make. They spend big on a controller but skip the supporting parts, leading to melted components, poor performance, and a lot of frustration.
The Solenoid: Your System’s Gatekeeper
The very first part that will fail under the new load is your stock solenoid. The solenoid is basically a heavy-duty relay that opens the floodgates, sending power from the batteries to the controller when you hit the gas. The one from the factory is only built for a low-amperage, stock system.
When you install a 400+ amp controller, the stock solenoid just can’t handle that initial surge of power. It will either weld itself shut—leaving your cart permanently stuck in "go" mode—or it will burn out entirely, leaving you stranded.
You absolutely must upgrade to a heavy-duty solenoid rated to match or exceed your new controller's amperage. For a 400-amp controller, that means a 400-amp solenoid at a minimum. This isn’t optional; it’s a critical step for both performance and safety.
Bigger Cables: Let Your System Breathe
Next up, you have to address your battery cables. Those skinny stock cables are another massive bottleneck. As your new controller starts pulling more amps, those undersized wires will heat up—a lot. That heat creates resistance, which chokes your motor, robs you of power, and can even melt your battery terminals.
To prevent this, you need to upgrade all the high-current cables to a thicker gauge.
- 4-Gauge Cables: This is the bare minimum for any controller upgrade. It's a significant improvement over stock and will work fine for most 400-500 amp systems used for neighborhood cruising and moderate hills.
- 2-Gauge Cables: If you're building a true performance cart with a 500+ amp controller, or you just want maximum efficiency, 2-gauge is the only way to go. These thick cables ensure the least amount of resistance and heat, letting your controller and motor run at their peak.
While you're at it, upgrading the battery pack itself is always a smart move. You can check out our guide on the benefits of a golf cart lithium battery conversion to learn more.
When a Motor Upgrade Becomes Necessary
Finally, let’s talk about the motor. For many upgrades up to around 500 amps, the stock EZGO motor can actually handle the extra power just fine, giving you a very noticeable boost in torque and speed. But there's a tipping point.
If you install a 500+ amp controller and plan on regularly tackling steep hills or carrying heavy loads, the stock motor will eventually overheat and give out. At that level of performance, a high-output motor built to pair with your controller stops being an option and becomes a necessity for a reliable and balanced system.
Troubleshooting Common Controller Issues
So you’ve just wrapped up the installation, feeling pretty good about your work. You hop in, turn the key, press the pedal, and... nothing. It's a frustrating moment, but don't throw your tools just yet. Most post-install gremlins are surprisingly simple to hunt down and fix.
Think of this as your field guide for getting your cart running right after a controller swap.
The scariest problem is when you get absolute silence. No clicks, no hums, just the sound of your own disappointment. This "no-go" situation is a classic, but it points to a handful of specific culprits. The very first thing you need to do is listen.
When you press the accelerator, do you hear a faint but distinct "click" from the solenoid? That click is everything. If you don't hear it, power isn't even getting to the starting gate.
The Cart Is Completely Dead
No solenoid click? Your problem is upstream from the controller. Your mission now is to trace the power from the batteries and find out where it’s getting stopped.
Run through this quick checklist:
- Tow/Run Switch: I know, I know. But you’d be amazed how often this is the issue. Make sure it's firmly in the RUN position.
- Key Switch: Is it actually working? Use a multimeter to check if power is coming into the switch and going out when you turn the key.
- Main Battery Connections: Get your eyes on the main positive and negative terminals of your battery pack. Are they clean and wrenched down tight? A loose main connection will kill all power.
Now, if the solenoid does click but the cart stays put, the game has changed. Power is making it through the solenoid but getting held up at the controller or motor. Grab your multimeter and check for full battery pack voltage at the controller's main B+ and B- terminals. If you've got no juice there, you're likely looking at a bad high-amp cable or a solenoid that clicks but isn't passing power.
Interpreting Controller Error Codes
Many modern aftermarket controllers come with a fantastic built-in diagnostic tool: a little LED that flashes in patterns when it detects a fault. These aren't just random blinks; they're specific error codes telling you exactly what the controller thinks is wrong.
For example, a two-flash sequence might point to a bad throttle sensor, while four flashes could mean an open circuit in the motor's field windings. Your controller's manual is the Rosetta Stone here—it will have a chart that translates each flash code into plain English.
Don't ever ignore the blink codes. They take a vague problem like "it won't go" and turn it into an actionable task, like "check the F1 and F2 motor terminals for a loose wire." This is, without a doubt, the fastest way to solve tricky electrical issues.
If you hit a wall after installing your new controller, remember that the troubleshooting principles are often similar across different electric vehicles. This practical guide to e-bike controller repair, for example, covers many of the same diagnostic concepts, just on a different machine.
Performance Problems Stuttering And Slow Speed
What if the cart moves but just isn't right? Stuttering under acceleration or feeling sluggish are two other common post-install complaints.
Stuttering is almost always the result of an intermittent power connection. The most likely cause is a loose, high-current cable. Go back and physically check every single large cable connection on the controller, solenoid, and motor. Give them a good tug.
If the cart runs smoothly but just feels like it's dragging, the problem might be in the programming. A new controller for ezgo golf cart often comes with a very conservative "out-of-the-box" profile. You'll need to connect to it with a laptop or app and dive into the settings. Make sure the parameters for acceleration, current limits, and max motor RPM are set where you want them.
Your Top Questions About EZGO Controllers Answered
So, you're ready to pull the trigger on a controller upgrade. That's fantastic. But I know that even after all the research, a few last-minute questions always pop up. Let's walk through the most common ones I hear so you can move forward with total confidence and get the performance you're paying for.
Will a New Controller Magically Give Me More Speed?
Yes and no. While a new controller is a key part of the speed equation, it's really all about unleashing torque and responsiveness. Think of it this way: your stock controller is deliberately programmed to "starve" the motor of amperage. An upgraded one finally lets it breathe.
The first thing you'll feel is a huge difference in acceleration and hill-climbing power. To get a major jump in top speed, you'll likely need to pair that high-amperage controller with a high-speed motor. The controller serves up the power, but the motor's design is what ultimately decides how fast it can spin.
Do I Really Need to Upgrade My Cables, Too?
Let me be crystal clear on this: yes, absolutely. Skipping the cable upgrade is probably the single most common—and expensive—mistake I see people make. Your cart's stock cables are just too thin to safely handle the juice a new controller will be pushing through them.
- Heat is the Enemy: Undersized cables create a ton of resistance, which generates heat. That heat not only chokes your cart's performance but can literally melt your battery terminals.
- Wasted Power: All that resistance means your motor isn't getting the full dose of power your new controller is trying to send. You’ve just defeated the whole purpose of the upgrade.
Moving up to at least 4-gauge cables isn't just a friendly suggestion; it's a non-negotiable requirement for a safe and effective installation.
I always tell people to think of it like trying to drink a thick milkshake through one of those tiny coffee stirrers. It doesn’t matter how powerful you are—you’re not getting much milkshake. Your motor feels the same way about undersized cables.
Is a New Controller Going to Kill My Batteries?
This is a valid concern, but it's not as straightforward as you might think. A high-amp controller gives your motor the ability to draw more power when you demand it—like when you’re punching it off the line or tackling a steep incline. If you drive aggressively all the time, yes, you'll use more battery.
However, a modern, efficient controller can actually be better for your batteries during normal, smooth driving. Many cart owners are surprised to find their overall range is about the same as it was before the upgrade. The big difference is that the power is now there when you need it.
What’s the Real Difference Between Navitas and Alltrax?
These are the two heavyweights in the aftermarket controller world, and they each have their own fan base. The choice really comes down to your personality and how much you like to tinker.
- Navitas: They're famous for their incredibly user-friendly, "plug-and-play" kits. Their standout feature is a fantastic mobile app that lets you adjust things like speed, acceleration, and regenerative braking on the fly using Bluetooth. It's perfect for the user who wants great performance with maximum convenience.
- Alltrax: This is the brand for the true DIY enthusiast and tuner. Alltrax offers an incredible depth of control over every tiny performance parameter, but it requires connecting to a laptop to do the programming. If you love fine-tuning and squeezing out every last drop of performance, Alltrax is your playground.
There's no wrong answer here—it just depends on whether you prefer out-of-the-box simplicity or the power to customize everything yourself.
A powerful and reliable cart lets you enjoy the walk and focus on your game. For an even more effortless round, consider adding the Caddie Wheel to your push cart. It delivers robust, remote-controlled power to take the strain out of any course.
Share:
The Best Golf Bag Cooler for Chilled Course Refreshments
Your Essential Caddie Wheel Club Cart Manual