When your electric golf cart starts acting up—hesitating, losing steam on hills, or just plain refusing to move—it’s easy to blame the batteries. But more often than not, the real culprit is the controller. A failing controller can definitely mimic a battery issue, but certain tell-tale signs, like jerky acceleration or a total loss of power under load, point straight to this critical component.
Knowing how to spot these symptoms is the first step in getting your cart back on the course.
Is Your Golf Cart Controller Failing
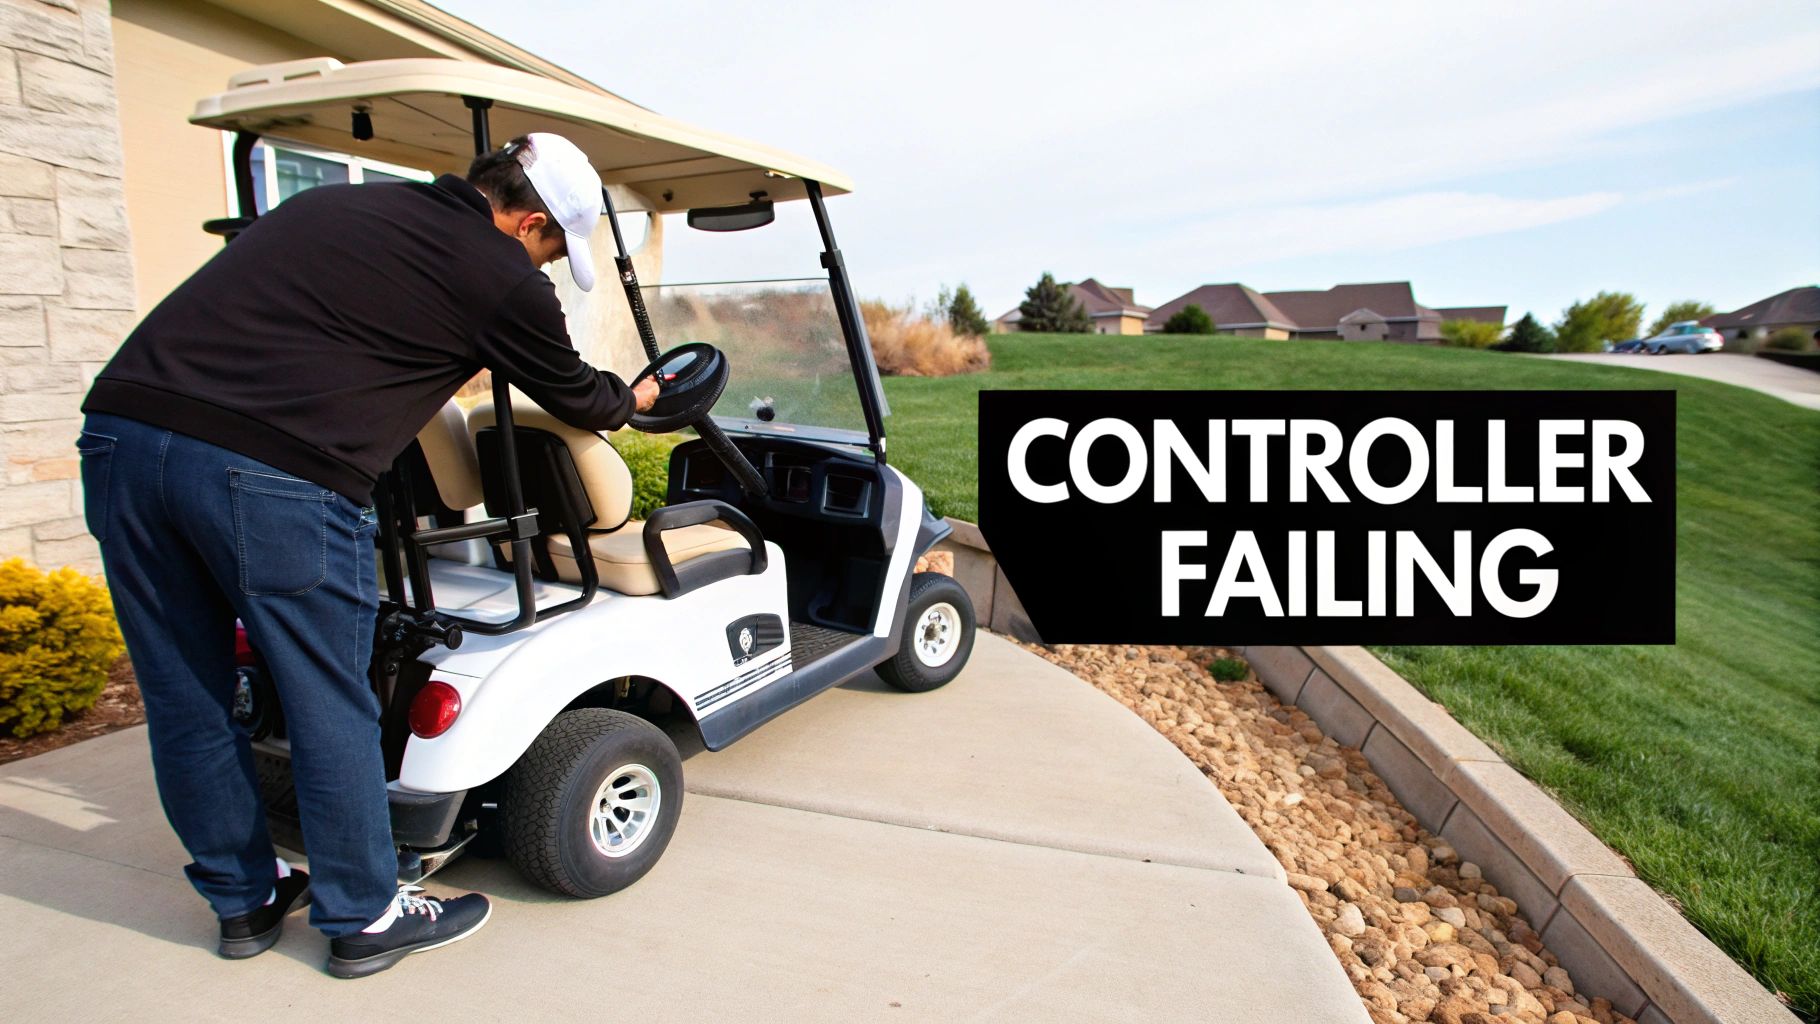
Think of your cart's controller as its brain. This small but powerful electronic box interprets the signal from your accelerator pedal and tells the batteries exactly how much juice to send to the motor. When it’s working right, your ride is smooth and responsive. When it starts to go bad, things get unpredictable and downright frustrating.
Catching the early warning signs is key. A common one I see is a cart that suddenly feels sluggish, struggling to climb a small hill it used to conquer without a problem. Another classic sign is erratic speed control—the cart might lurch forward without warning or can't seem to hold a steady speed, even on flat ground.
Decoding the Symptoms of Failure
The real challenge for most owners is telling the difference between a controller problem and a battery problem. Both can tank your cart's performance, but they show up in different ways.
Weak batteries usually lead to a slow, gradual decline in power and range over the course of a charge. A faulty controller, on the other hand, causes problems that are much more sudden and inconsistent.
To help you narrow it down, here’s a quick-reference table matching common symptoms to their likely causes.
Common Symptoms and Potential Causes
| Symptom | Likely Controller Issue | Possible Other Causes |
|---|---|---|
| "Click, but no go" | Controller not sending power to the motor. | Faulty solenoid, bad motor, or corroded high-amperage wiring. |
| Jerky or stuttering acceleration | Failing throttle input circuit (potentiometer). | Worn motor brushes, intermittent wiring connection. |
| Loss of power on hills/under load | Controller overheating or failing to regulate current. | Weak battery pack, poor battery cable connections. |
| Cart only moves in one direction | Failure in the controller's directional circuits. | Bad forward/reverse switch, faulty solenoid. |
| Burning smell (plastic/electronics) | Internal components overheating and melting. | Frayed wiring shorting out, seized motor bearings. |
This table should give you a solid starting point for your diagnosis, helping you figure out if the controller is truly the issue or if you should be looking elsewhere.
Here are a few of the most common symptoms I run into that scream "controller issue":
- The "Click, No Go" Problem: You step on the pedal, you hear the main solenoid click like it’s supposed to, but the cart just sits there. That click means the controller is getting the signal to go but isn't delivering the power to the motor.
- Jerky or Stuttering Acceleration: Instead of a smooth takeoff, the cart lurches or stutters. This is often caused by a failing throttle input circuit inside the controller.
- Loss of Power Under Load: The cart seems fine on flat ground but slows to a crawl the second it hits an incline or you add a passenger.
- Operating in Only One Direction: The cart drives perfectly in forward but won't budge in reverse (or vice-versa). This points right to a failure in the controller's internal switching circuits.
And if you ever smell something burning—like hot plastic or fried electronics—that’s a major red flag. Stop the cart immediately, disconnect the batteries, and look for melted wires or burn marks on the controller's casing. If you're digging into the electrical system, our guide on checking golf cart fuses is a great resource for staying safe.
An Increasingly Common Repair
As electric carts continue to dominate the market, making up a massive 81.81% market share, controller problems have become one of the most common repairs we see. This shift away from gas is great for quiet operation and lower running costs, but it means we rely heavily on these sophisticated electronics.
Industry service data shows that controllers fail at a rate of about 15-20% within the first 3-5 years of regular, heavy use. This just goes to show how important it is to get the diagnosis right.
Key Takeaway: Don't automatically assume your batteries are dead. If your cart's behavior is sudden and erratic—stuttering, surging, or refusing to move even though the solenoid clicks—your controller should be at the top of your suspect list.
By paying close attention to how your cart is misbehaving and comparing it to these common symptoms, you can confidently zero in on the controller and avoid wasting time and money chasing the wrong fix.
Getting Your Toolkit Ready for a Safe Repair
Trying to fix a golf cart controller without the right tools is like showing up to the first tee with just a putter. You might get somewhere eventually, but it's going to be a frustrating mess, and you'll probably do more harm than good. Before you even think about touching a single wire, putting together the right toolkit is your first and most important step. This isn't just about having a few wrenches—it's about having the correct tools to keep you safe and ensure the repair actually works.
Let's be clear: you're working with a high-amperage electrical system here. It demands respect. One simple slip-up, like using a non-insulated tool in the wrong spot, can cause a dangerous short circuit that could fry expensive components or, worse, cause serious injury. The goal is to walk into this job with confidence, knowing you have everything you need to do it right.
The Essential Tools for Diagnosis and Repair
Having the right gear on hand transforms a job that feels overwhelming into a straightforward process. You don't need a professional mechanic's entire garage, but a handful of items are absolutely non-negotiable for tackling a golf cart controller repair.
Here’s a look at the must-haves and why each one is so critical:
- Digital Multimeter: This is your best friend for diagnostics, period. It’s the only way to safely measure voltage, check for continuity, and test resistance. It tells you if power is getting to the controller and if it's being sent out to the motor. Without one, you're just guessing.
- Insulated Wrench and Socket Set: A standard metal wrench is a huge risk around a battery pack. Insulated tools have a non-conductive coating that gives you a crucial buffer against accidental shorts when disconnecting those heavy-duty battery terminals.
- Safety Glasses and Gloves: Don't even think about starting without these. Batteries can contain corrosive acid, and electrical work can create unexpected sparks. Protect your eyes and hands—always.
- Wire Brush or Terminal Cleaner: Corrosion is the silent killer of electrical connections. A simple wire brush is perfect for scrubbing battery terminals and cable ends to get a solid, clean connection, which is vital for the controller to work properly.
- Nut Drivers and Screwdrivers: You’ll need a good set of these for everything from removing the controller’s cover to disconnecting smaller wires and accessing its mounting bolts. Having a variety of sizes means you won't get stuck.
Getting your toolkit organized is key for a safe repair. For some great ideas on putting together a solid tool collection, the principles behind building a comprehensive bike repair kit offer some useful parallels.
The Golden Rules of Electrical Safety
More important than any tool is your mindset and commitment to safety. The amount of power stored in a golf cart battery pack is no joke and can be extremely dangerous if you're careless. Before you start, you need to burn these procedures into your brain.
Safety First, Always: The most important step before you touch anything is to flip the cart's tow/maintenance switch to the "Tow" position. This shuts down the entire electrical system so the cart can't lurch forward unexpectedly. After that, you must physically disconnect the main negative battery terminal from the pack to completely kill the power.
This two-step shutdown is your main line of defense against electric shock and accidental power-ups. It's a simple habit that makes the difference between a safe job and a trip to the emergency room.
Another pro tip: give the capacitors inside the controller time to discharge after you've disconnected the power. These components can hold a surprising amount of charge for several minutes. Just step away for five to ten minutes after pulling the battery cable. Rushing this is a rookie mistake that can lead to a nasty jolt. By sticking to these fundamental rules, you create a safe workspace where you can confidently get the job done.
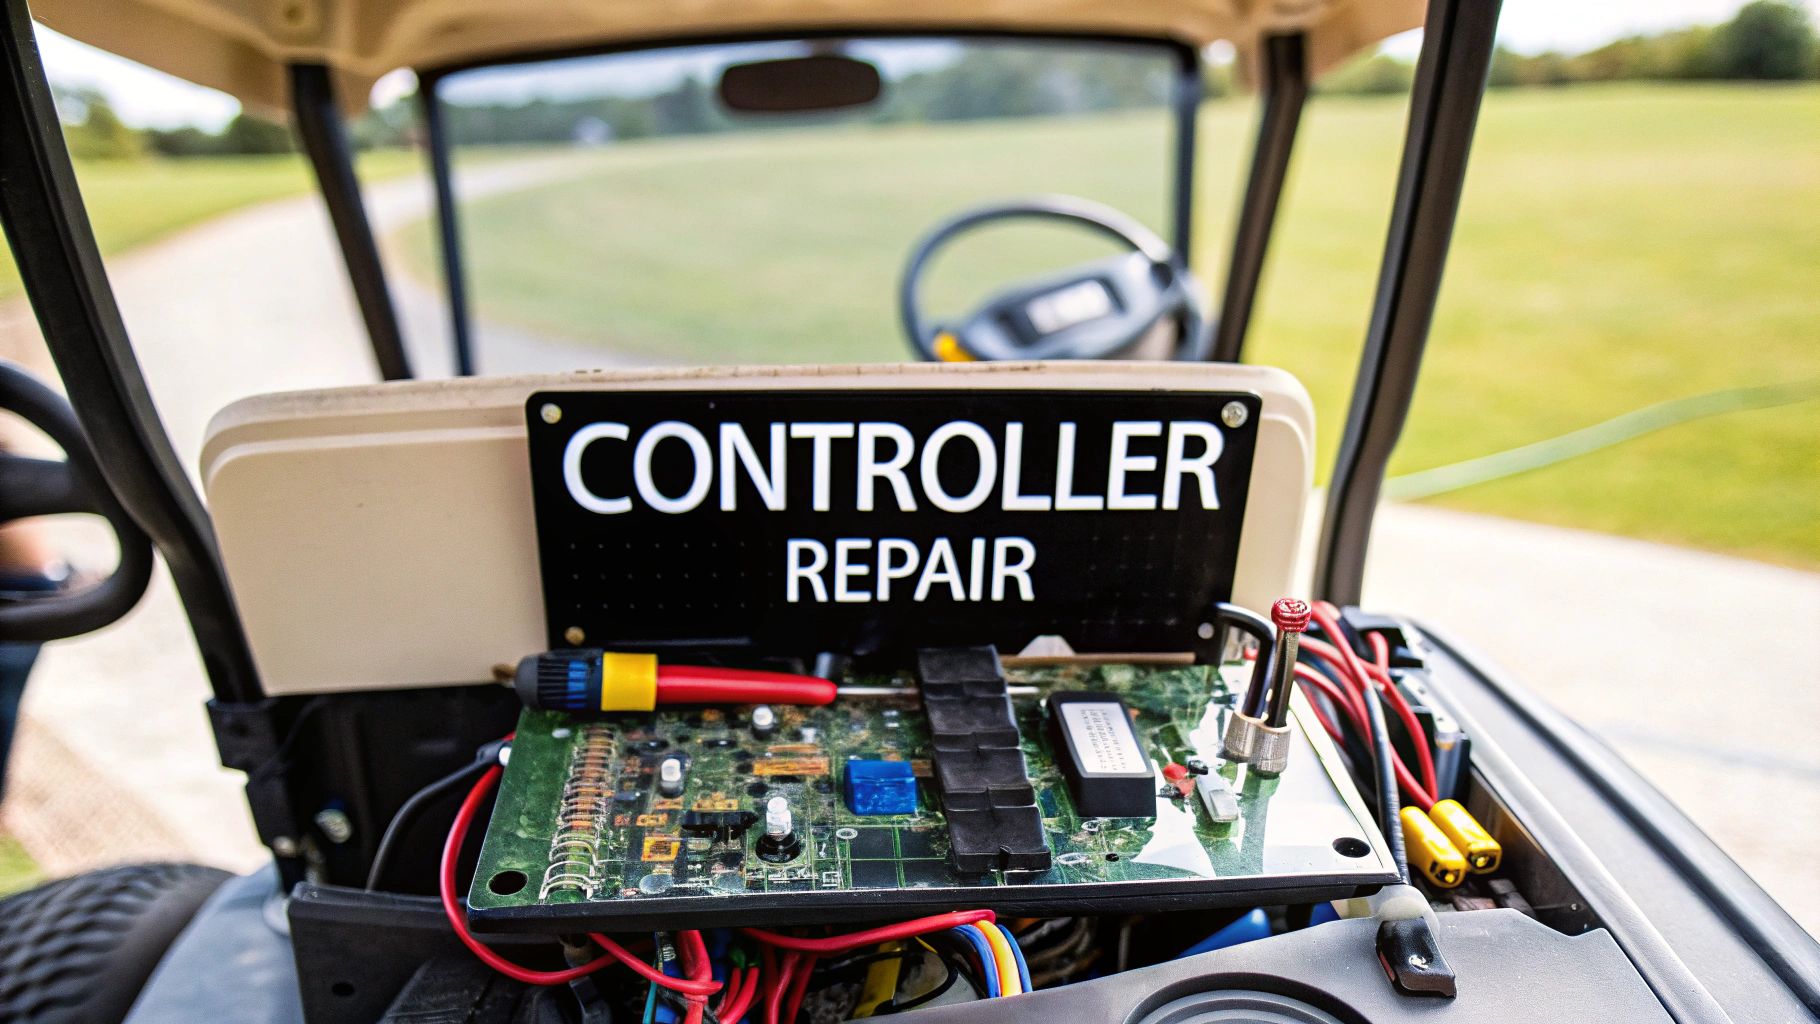
Getting Your Hands on the Controller to Test It
Alright, you've got your tools, and you know the safety drill. It's time to get in there and find out what's really going on with the controller. This is the make-or-break moment where we stop guessing based on symptoms and start gathering hard evidence.
It might look a little intimidating with all those wires, but it's just a logical process. I'll walk you through finding the controller, getting it disconnected safely, and using that multimeter to run a few simple tests that will tell you for sure if the controller is the culprit.
Where to Find the Controller and How to Safely Access It
First thing's first—you have to find the controller. The exact location can differ a bit between makes and models, but they usually hide in a few common spots.
- Under the Seat: This is the go-to spot for most carts, especially big names like E-Z-GO and Club Car. Just lift the seat, and you'll see the battery bay with the controller mounted right nearby.
- In a Rear Access Panel: Some carts tuck the electronics away behind a dedicated panel on the back or side. You'll just need to undo a few screws to get in there.
- Near the Motor: It makes sense for the controller to be close to the motor it's controlling. You'll often find it bolted directly to the cart's frame, which also helps it get rid of heat.
Once you've spotted it, the next step is the most critical one for your safety. Flip the cart's switch to "Tow" mode and disconnect the main negative battery cable. Don't skip this. It's non-negotiable. Only after that's done should you touch anything else.
Pro-Tip: Before you unplug a single wire, pull out your phone and take a few clear, bright pictures of the wiring setup. For bonus points, grab some colored zip ties or masking tape and label each wire. Trust me, this little step will save you a world of pain when it's time to put it all back together.
The Initial Once-Over
Before you break out the multimeter, just use your eyes. A quick visual inspection of the controller and the area around it can often tell you everything you need to know.
You're looking for the obvious stuff:
- Burnt or Melted Wires: This is a dead giveaway of a short circuit or some serious overheating.
- Corroded Terminals: Any green or white crusty buildup on the connections is bad news and will block the flow of electricity.
- Physical Damage: Look for any cracks in the controller's casing. An impact or extreme heat could have caused it.
- That Burnt Plastic Smell: Your nose knows. If you catch a whiff of that pungent, burnt electronics smell, something inside has definitely fried.
If you find any of these red flags, it's almost certain your controller is toast and needs to be replaced.
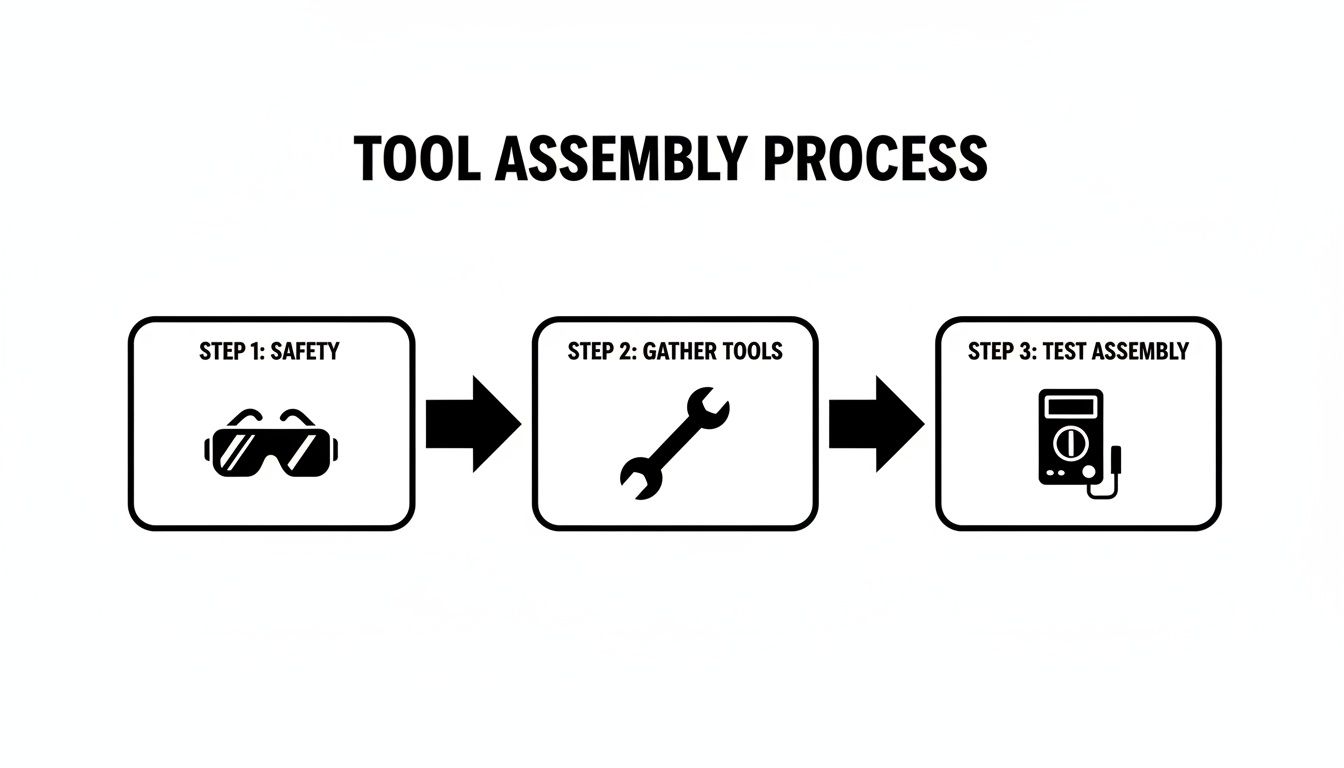
This process flow really drives home the safety-first approach. Get your gear and your head straight before you start poking around.
Using a Multimeter for the Real Tests
If the visual check comes up clean, it's time for the multimeter to do its job. These voltage tests will tell us if power is getting to the controller and if it's sending power out like it should.
Checking Input Voltage
First, let's see if the controller is even getting the juice it needs from the battery pack. Switch your multimeter to DC Volts.
- Temporarily reconnect that main negative battery cable just for this test.
- Take the red (positive) probe from your multimeter and touch it to the controller's main B+ terminal.
- Now, take the black (negative) probe and touch it to the main B- terminal.
The reading you get should be right around the total voltage of your battery pack—think 48 to 51 volts for a standard 48V system. If that number is low or you're getting nothing at all, your problem is with the batteries or the main cables, not the controller. Our guide on https://caddiewheel.com/blogs/golf-content/how-to-test-battery-capacity-a-practical-guide can help you dig into that.
Testing the Throttle Signal
Next, we need to know if the controller is getting the message to "go" when you press the accelerator. This signal comes from the throttle and is usually a variable voltage.
For a typical 0-5V throttle system:
- You'll need to consult a wiring diagram for your specific cart to find the throttle input wire.
- With the multimeter probes ready, slowly press the accelerator pedal. You should see the voltage on that signal wire climb smoothly from 0 volts up to about 5 volts.
If the voltage reading is jumpy, stays at zero, or shoots straight to 5V with just a tiny bit of pressure, the problem is likely your throttle sensor, not the controller.
Measuring Output Voltage to the Motor
This is it—the final test that tells the whole story. Is the controller actually sending power out to the motor?
- Connect the multimeter's black probe to the controller's B- terminal.
- Connect the red probe to the M- terminal (this is the main output that goes to the motor).
- Make sure the cart's wheels are safely jacked up off the ground, then press the accelerator.
As you press the pedal, the voltage should climb smoothly from 0 all the way up to the full battery pack voltage. If your input voltage and throttle signal were good, but you're getting zero or very low voltage here at the M- terminal, you've found your problem. The controller is faulty.
Industry data shows that controller repairs have jumped by 25% since electric carts started dominating the market. Interestingly, about 22% of all cart downtime in hotter climates is tied directly to controller overheating, as high ambient temperatures put a massive strain on the electronics. This really drives home why we need to test properly instead of just guessing.
For a deeper dive into board diagnostics, this guide on how to test a circuit board is a fantastic resource.
Choosing and Sourcing a Replacement Controller
Okay, so you've done the diagnostic work and confirmed the controller is the culprit behind your cart's bad behavior. Now comes the next step: finding the right replacement. This part of the journey can feel a bit like navigating a minefield, with a ton of options staring back at you at all sorts of price points.
Getting this choice right is absolutely critical. It’s the key to getting your cart running properly again and making sure it stays that way for the long haul. The goal here is to land on a compatible unit that fits your budget without skimping on quality. We'll break down exactly what you need to know, from picking between factory parts and aftermarket upgrades to pinpointing the specs for a perfect match.
OEM vs. Aftermarket Controllers
One of the first forks in the road is deciding whether to stick with an Original Equipment Manufacturer (OEM) part or explore the aftermarket. An OEM controller is a carbon copy of the one your cart left the factory with. It's the safe bet, guaranteeing a perfect fit and the same performance you're used to.
An aftermarket controller, on the other hand, is built by a third-party company. These can be anything from a simple, budget-friendly replacement to a high-performance beast designed to seriously boost your cart's speed and torque.
Here’s a quick rundown to help you weigh your options:
| Feature | OEM Controller | Aftermarket Controller |
|---|---|---|
| Compatibility | Guaranteed to fit and work perfectly with your specific cart model. | Usually compatible, but you have to match the specs carefully. |
| Performance | Brings your cart back to its original factory performance. | Can offer stock performance or major upgrades in speed and torque. |
| Cost | Typically more expensive, running from $250 to over $800. | Often more affordable for stock replacements. Performance models can cost more. |
| Warranty | Comes with a solid manufacturer's warranty. | Warranty varies by brand, but reputable companies offer good coverage. |
For a lot of folks, an aftermarket controller just offers better value. You can often snag a more robust unit for the same price—or even less—than an OEM part. And if you're even thinking about future upgrades like a bigger motor or lithium batteries, grabbing an aftermarket controller with a higher amperage rating now is a really smart move. For more tips on getting the most out of your cart, check out our guide to electric golf cart speed control.
How to Identify the Correct Replacement
Trust me, buying the wrong controller is a costly mistake you don't want to make. Before you even open a browser tab to start shopping, you need to collect some critical intel from your cart and its dead controller. The part number is your golden ticket.
Get up close and personal with the controller's casing and look for a sticker or a small plate. It will have the manufacturer’s name (like Curtis or Navitas) and, most importantly, a specific model or part number. Write it down and snap a clear picture with your phone.
Next, you'll need your cart's vitals:
- Make and Model: Is it a Club Car DS, an E-Z-GO TXT, or a Yamaha Drive? The year matters, too.
- Voltage: Do you have a 36V or 48V system? An easy way to check is to count the batteries and multiply by their individual voltage (usually 6V or 8V).
- Drive System: This one's crucial. Is your cart running a Series or a Sep-Ex (Separately Excited) motor? The controller has to match the motor type.
Key Insight: Here's a handy field trick to tell a Series from a Sep-Ex system. Look at the forward/reverse switch. A big, clunky lever-style shifter almost always means you've got a Series cart. A small, simple rocker switch on the dash? That's typically a Sep-Ex system.
Once you’ve got all this information written down, you can start your search with confidence. Good online suppliers let you filter parts by your cart’s make, model, and year, which makes finding a direct-fit replacement a whole lot easier.
Considering Professional Rebuilding Services
There’s a third path that can be a fantastic middle ground: getting your original controller professionally rebuilt. This is a great option, especially for older or more obscure cart models where finding a brand-new replacement is either impossible or ridiculously expensive.
When you send a controller in for a rebuild, technicians hunt down the exact point of failure. They replace the busted internal components—often with parts that are better than the original—and then put the unit through rigorous testing to make sure it meets or even exceeds factory specs.
- Cost-Effective: Rebuilding can be significantly cheaper than shelling out for a new OEM controller.
- Eco-Friendly: It’s a great way to keep electronic waste out of the landfill.
- Upgraded Internals: Many rebuild services use higher-quality, more durable components than what the factory installed, potentially giving your controller a new lease on life.
The main trade-off is time. You'll have to ship your controller out and wait for the repair and return, which can take a week or more. But if you’re not in a huge rush, it’s an excellent way to get a top-quality, reliable repair without breaking the bank.
Reassembly and Preventive Maintenance Tips
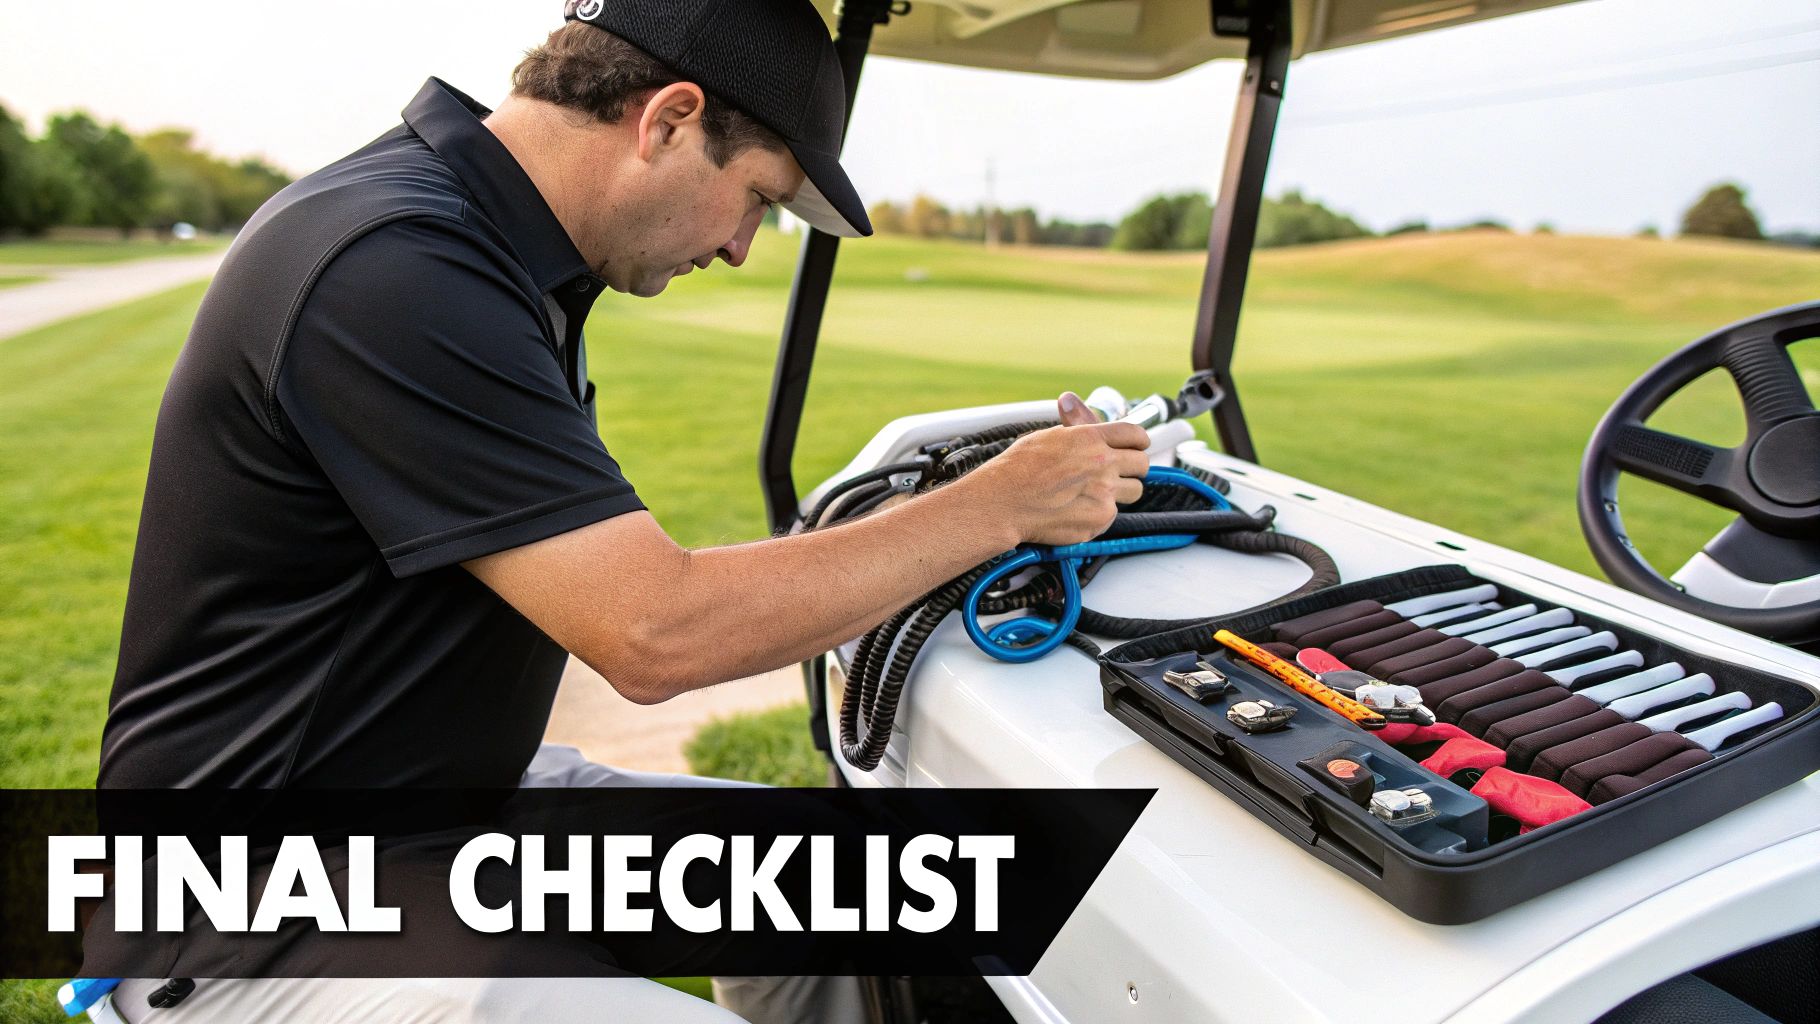
You’ve got the new or rebuilt controller, and you're on the home stretch. But don't get ahead of yourself—a successful repair isn't finished until the last bolt is tight and the cart is running like a top. The reassembly is just as crucial as the diagnosis. One forgotten ground wire or a loose connection can send you right back to square one.
This is where patience really pays off. It’s tempting to rush through these final steps, but that’s a classic mistake that leads to frustrating performance issues or, even worse, damage to your brand-new component. A methodical approach is your best friend here. It ensures every connection is solid, every wire is secure, and your cart is ready for a reliable return to the course.
The Correct Reassembly Sequence
Putting it all back together is pretty much the reverse of how you took it apart, but with a few key things to watch for. If you took photos and labeled your wires earlier, you're going to thank yourself now.
Start by mounting the new controller in its designated spot. Get it bolted down firmly. A controller that's loose can vibrate like crazy, which is terrible for its internal electronics over the long haul.
Once it's secure, start reconnecting the wiring. I always like to begin with the smaller gauge wires—the ones from the throttle, solenoid, and forward/reverse switch. Check your photos and labels to make sure everything is going to the right terminal. Finally, attach the main high-amperage cables (B+, B-, and M-). Get them good and snug.
Crucial Tip: When tightening the nuts on the terminals, go easy. Those posts can be surprisingly delicate. If you over-tighten, you can snap the stud right off the controller, turning a successful job into a complete disaster. You're aiming for a connection that's snug and secure, not one you've cranked down with all your might.
Your Pre-Flight Checklist Before Powering Up
Hold on. Before you even think about reconnecting that main battery cable, take five minutes to run through a final inspection. This quick check can save you from a very costly mistake.
- Double-Check All Connections: Go back and give each wire a gentle wiggle right at the terminal. A loose connection is the #1 cause of problems after a repair.
- Confirm Wire Routing: Make sure no wires are pinched, stretched, or rubbing against any sharp metal edges on the frame.
- Inspect Terminal Integrity: Look closely at every high-amperage cable lug. It needs to be clean and sitting perfectly flush against its terminal.
- Clear the Area: Last but not least, make sure there are no tools, stray nuts, or bolts left lying around the battery bay or near the controller.
Only after you’ve ticked every box on this list should you reconnect the main negative battery cable and flip the tow/run switch back to "Run."
The All-Important Post-Repair Test Run
Alright, this is the moment of truth. With the cart powered up and the wheels still off the ground, do a stationary test first. Gently press the accelerator. You should hear the distinct click of the solenoid, followed by the smooth whir of the motor as the wheels start to turn.
Now, lower the cart and take it for a slow spin in a flat, open area. Pay close attention to how it feels.
- Does it accelerate smoothly, without any jerking or hesitation?
- Does it respond properly in both forward and reverse?
- Can it hold a steady speed?
- Does it still have good power when you hit a slight incline?
If the cart performs flawlessly, pop open a cold one—you’ve just successfully repaired your golf cart controller. If anything feels off, immediately head back to your connections and double-check that every wire is exactly where it should be.
Protecting Your Investment with Preventive Care
You’ve put time and money into this fix, so let's make sure it lasts. A few simple maintenance habits can dramatically extend the life of your new controller and help you avoid future headaches. For starters, just keeping the controller and the area around it clean from dirt and grass clippings goes a long way. All that gunk traps heat, which is the enemy of all electronics.
Here are a few more proactive steps you can take:
- Monthly Terminal Checks: Once a month, just pop the seat and take a quick look at all the high-amperage connections on the controller and batteries. Make sure they’re still tight and free of any corrosion.
- Ensure Proper Ventilation: The controller is covered in fins for a reason—they get rid of heat. Check that nothing is blocking airflow around the unit.
- Avoid High-Pressure Washing: Whatever you do, never spray a pressure washer or hose directly onto the controller or its wiring. You can force moisture into sensitive areas, leading to shorts and corrosion down the road.
By making these simple checks part of your routine, you’ll keep your cart's electronic brain in prime condition for many more trouble-free rounds.
Common Questions About Controller Repair
Even after a successful repair, it’s natural to have a few questions rattling around. Your cart’s controller is the brain of the operation, but for many owners, it’s still a bit of a black box. Getting clear answers to the most common questions can give you more confidence in your repair and help you keep your cart running smoothly down the road.
Let's dive into some of the things we hear most often from golfers and cart owners.
Can a Bad Controller Drain My Golf Cart Batteries?
Absolutely. A faulty controller is a classic culprit for a parasitic draw that can drain your batteries, even when the cart is just sitting there. An internal short or a busted circuit can create a slow, silent power leak that leaves you with a dead cart when you least expect it.
If your batteries are losing charge way faster than they should—and you know they’re otherwise healthy—the controller should be high on your list of suspects. This is especially true if you’ve double-checked that no lights or accessories were left on. You can use a multimeter to test for that parasitic draw and confirm if the controller is the source of your headache.
What Is the Difference Between a Series and Sep-Ex Controller?
The big difference here is how they talk to the motor, which is why you can't just swap one for the other. Getting this right is one of the most critical parts of any controller replacement.
- A Series controller is the old-school workhorse. It’s paired with a series-wound DC motor and you’ll typically find them in older carts or heavy-duty utility vehicles. They're all about raw, high-torque power, which makes them great for climbing hills.
- A Sep-Ex (Separately Excited) controller is the more modern, sophisticated option. It works with a motor where the armature and field circuits are controlled independently. This design is what allows for slick features like regenerative braking, where the cart helps recharge the batteries a bit when you go downhill.
It is absolutely essential to replace your controller with the same type your cart was designed for. Installing the wrong type will not work and can damage the new controller, the motor, or both.
Is It Better to Repair or Replace a Faulty Controller?
For 99% of cart owners, replacing the entire controller is the way to go. It's faster, more reliable, and far more practical.
Actually repairing a controller's circuit board is a job for a specialist. It requires deep electronics knowledge, precision soldering skills, and diagnostic gear that you just won't find in most home garages.
While you could send it off to a professional rebuilding service, the cost and turnaround time often end up being about the same as just buying a brand-new aftermarket controller. A straightforward replacement—disconnecting the old unit and plugging in the new one—will get you back on the course much quicker.
How Can I Protect My New Controller From Failing?
Keeping your new controller happy comes down to protecting it from its three biggest enemies: heat, moisture, and wonky voltage. A few good habits can make a massive difference in how long it lasts.
First, make sure the controller has room to breathe. Keep it clean from packed-in mud, grass, or other debris that can trap heat and cause it to cook itself. And whatever you do, avoid hitting the controller area directly with a pressure washer. That’s a surefire way to force water into sensitive spots, leading to corrosion and short circuits.
Finally, give it clean power. A healthy battery pack and a properly functioning charger are non-negotiable. A bad charger or dying batteries can send voltage spikes and dips that put a huge strain on the controller’s electronics. Regularly checking that all your high-amperage cables are clean and tight will also prevent resistance buildup—a major cause of overheating.
At Caddie Wheel, we believe in making golf more enjoyable by reducing the physical strain of the game. Our powerful, easy-to-install motorized wheel lets you walk the course without the push, so you can focus on your next shot, not the next hill. Experience the difference a little power can make. https://caddiewheel.com
Share:
Your Guide to the Modern Golf Remote Control Cart
Your Complete Guide to Golf Bag Pull Carts and Electric Upgrades